This was my completed quilt for the week - roughly 20" square and based on this pattern by Kjersti Smith (thank you Kjerski and Creative Quilting for making it free to download for April).
Displayed in our window to say 'thanks' to everyone who is still working, whether at home or out on the front line, in service, care and health industries and every other industry too! We will need all of you who are preventing the economy to completely grinding to a halt, as well as those who are more commonly recognised. Thank you everyone who is doing their bit to keep the wheels on!
Here is the start of my scrap busting.
This carpenters wheel has used all my neutral or near neutral charm squares, and most of my blue and purple ones. At 32" square it needs more to be a useful size, but I will look through my scraps and 'small yardage' bits to see what falls into place.
I'm so pleased to make this, though, as it has been on my list for years to make!
Then it was time to make cards. I may not be able to see family and friends this Easter, but I can share the love by sending a card.
During March there were a number of birthdays that I made cards for too. I need to get making the ones for April now (and ask my DH to buy some more postage stamps!).
Stay safe, stay well, and stay in!
Wednesday, 8 April 2020
Wednesday, 1 April 2020
Small Victories
My scraps are finally all sorted (for the moment!)
It's hard to believe that they all fitted into the three plastic drawers, even harder to believe that they all fitted back again!
But here's the proof!
Neatly sorted. Either by size, or, with the irregular strips and rectangles, by colour (in the zip lock bags in the middle drawer.
It's left me with decisions about how to use them, of course. But a decision for another day!
A second small victory? This floral wreath is complete - a cross stitch piece that I've been working on for an online course (showing that I can use variagated thread - there are only six different threads used here. Sometimes with thread lengths used 'top to tail' to give variation within a stitch, sometimes just trying to use the darker and lighter colours to pick out different parts of flower heads.
Reminds me of something that my grandma might have liked!
A third victory? Not so small, this one. My BF had her lumpectomy (a victory in itself in these uncertain times) and the cancer hasn't spread into the lymph node! Hurrah! Thank heavens for screening programs...... and what a shame that they are temporarily closed in many places at the moment, for obvious reasons.
It's hard to believe that they all fitted into the three plastic drawers, even harder to believe that they all fitted back again!
But here's the proof!
Neatly sorted. Either by size, or, with the irregular strips and rectangles, by colour (in the zip lock bags in the middle drawer.
It's left me with decisions about how to use them, of course. But a decision for another day!
A second small victory? This floral wreath is complete - a cross stitch piece that I've been working on for an online course (showing that I can use variagated thread - there are only six different threads used here. Sometimes with thread lengths used 'top to tail' to give variation within a stitch, sometimes just trying to use the darker and lighter colours to pick out different parts of flower heads.
Reminds me of something that my grandma might have liked!
A third victory? Not so small, this one. My BF had her lumpectomy (a victory in itself in these uncertain times) and the cancer hasn't spread into the lymph node! Hurrah! Thank heavens for screening programs...... and what a shame that they are temporarily closed in many places at the moment, for obvious reasons.
Wednesday, 25 March 2020
Sunshine and Showers
The joy of celebrating a birthday in the family.
Even if the 'proper' celebration turns out to be over a video call with other family members.
We can create sunshine wherever possible.
Impossible to get away from the showers, though.
So when many are facing CV and the related issues, I am worried about my best friend who needs to have surgery for breast cancer. I've made her a cushion and a 'wiggly bag', but won't know for sure whether her surgery will go ahead tomorrow, or, as it is classified as 'non-essential' it will have to be cancelled. Of course, I also won't know whether the post services from here to Australia will work in their usual timeframes!
We wait to hear and we hope.
In the meantime our umbrellas (of self distancing, being kind, doing what we can to help others) are up.
Stay safe and well, everyone. I hope that you find enough sunshine to make rainbows of your own personal showers.
Even if the 'proper' celebration turns out to be over a video call with other family members.
We can create sunshine wherever possible.
Impossible to get away from the showers, though.
So when many are facing CV and the related issues, I am worried about my best friend who needs to have surgery for breast cancer. I've made her a cushion and a 'wiggly bag', but won't know for sure whether her surgery will go ahead tomorrow, or, as it is classified as 'non-essential' it will have to be cancelled. Of course, I also won't know whether the post services from here to Australia will work in their usual timeframes!
We wait to hear and we hope.
In the meantime our umbrellas (of self distancing, being kind, doing what we can to help others) are up.
Stay safe and well, everyone. I hope that you find enough sunshine to make rainbows of your own personal showers.
Tuesday, 17 March 2020
Scrap Busting
When your scraps are trying to break out of your drawers you know that it's time to take action!
The labels giving sizes on each of the drawers are more good intentions, or a once, now distant, dream. What actually happens is that I just stuff scraps in there at the end of a project.
They didn't look less full once I'd pulled them out from the unit - but I did discover that the bottom drawer is still full from last time I had a good sort out. Oops! Those bags will be added to over the next couple of weeks, I'm sure.
The contents of just one drawer - which represents several hours of cutting ahead of me. I'll be working to my usual sizes.
The labels giving sizes on each of the drawers are more good intentions, or a once, now distant, dream. What actually happens is that I just stuff scraps in there at the end of a project.
They didn't look less full once I'd pulled them out from the unit - but I did discover that the bottom drawer is still full from last time I had a good sort out. Oops! Those bags will be added to over the next couple of weeks, I'm sure.
The contents of just one drawer - which represents several hours of cutting ahead of me. I'll be working to my usual sizes.
- 10" squares
- 5" squares
- 3.5" squares
- 2.5" strips
- 2" strips
- 1.5" squares
- Odd bits and odd strips
These are sizes that I can use up easily. Anything smaller than either 1.5" square or 1.25" strip gets thrown away.
Once I've finished all the cutting (I expect that it will take a couple of weeks, doing it just sometimes to not over do the shoulder or wrist efforts required) it will be time to decide how I'm going to use them.
Wednesday, 11 March 2020
Orange Peel Quilt
Remember that I started this quilt a few weeks ago?
It's been a slow finish (half term, other projects and events getting in the way of sewing time!) but it's finally complete!
I made the orange peel blocks that I'd made into a medallion, and then raided the 'small yardage' piles to add borders.
I have to be honest. I'd wanted to add a border of the dark pink too, but it didn't quite work out for me.
Then I thought that it would make a great binding, before looking at the colourful zig zag I'd chosen for the back and realising that there was no pink in it to speak to.....
I had fun with the quilting. Can you see here the loopy fill on the segments? Then I used a meander in between.
The quilt finished at about 42" square.
Isn't this a jazzy back? So pleased with it!
Another one on the pile for Project Linus.
Now to go and think about what to make next! I have a list, so perhaps it will be something from that.
It's been a slow finish (half term, other projects and events getting in the way of sewing time!) but it's finally complete!
I made the orange peel blocks that I'd made into a medallion, and then raided the 'small yardage' piles to add borders.
I have to be honest. I'd wanted to add a border of the dark pink too, but it didn't quite work out for me.
Then I thought that it would make a great binding, before looking at the colourful zig zag I'd chosen for the back and realising that there was no pink in it to speak to.....
I had fun with the quilting. Can you see here the loopy fill on the segments? Then I used a meander in between.
The quilt finished at about 42" square.
Isn't this a jazzy back? So pleased with it!
Another one on the pile for Project Linus.
Now to go and think about what to make next! I have a list, so perhaps it will be something from that.
Tuesday, 3 March 2020
Mother's Delight! A perfect Mother's Day Gift.
Aren't these gorgeous?
A rainbow of reusable 100% cotton facial cleaning pads.
A brilliant replacement for people who use those 'throw away' cotton pads or disposable wipes.
Made by my lovely younger daughter!
Available from her Etsy shop here
AngelicCleansing
You can buy rainbow sets. You can buy sets of 5 or 10 or 15 wipes (approx 3" square). You can buy sets of 4 larger wipes (approx 5" square).
Why are they square? Because she wants to create goods with the least possible waste, so rejected the idea of round pads.
Why are they 100% cotton? Because she wanted something that would wash easily with your general wash, not need special attention.
My little angle (she's lovely!) is raising money for an expedition to Borneo next year with her school, when she will get involved in community and environmental projects there.
She choose to make and sell these wipes to not only raise money, but also try to encourage people to take one more small step to removing disposable goods from their lives.
Perhaps you'd like some? Perhaps they would be the ideal gift for your mum on Mothers Day?
They are sold in a reusable storage bag, neatly labelled with what they are.
She delights me, as she is being productive, creative, and using her sewing skills (yay for all crafters!).
You can see here, she has stock ready to select and send!
Once more, AngelicCleansing.
or, if you can get to Twickenham, you can find her products in The People Hive, Heath Road, alongside FabWraps - the perfect wrapping for your gift from my elder daughter!
A rainbow of reusable 100% cotton facial cleaning pads.
A brilliant replacement for people who use those 'throw away' cotton pads or disposable wipes.
Made by my lovely younger daughter!
Available from her Etsy shop here
AngelicCleansing
You can buy rainbow sets. You can buy sets of 5 or 10 or 15 wipes (approx 3" square). You can buy sets of 4 larger wipes (approx 5" square).
Why are they square? Because she wants to create goods with the least possible waste, so rejected the idea of round pads.
Why are they 100% cotton? Because she wanted something that would wash easily with your general wash, not need special attention.
My little angle (she's lovely!) is raising money for an expedition to Borneo next year with her school, when she will get involved in community and environmental projects there.
She choose to make and sell these wipes to not only raise money, but also try to encourage people to take one more small step to removing disposable goods from their lives.
Perhaps you'd like some? Perhaps they would be the ideal gift for your mum on Mothers Day?
They are sold in a reusable storage bag, neatly labelled with what they are.She delights me, as she is being productive, creative, and using her sewing skills (yay for all crafters!).
You can see here, she has stock ready to select and send!
Once more, AngelicCleansing.
or, if you can get to Twickenham, you can find her products in The People Hive, Heath Road, alongside FabWraps - the perfect wrapping for your gift from my elder daughter!
Tuesday, 11 February 2020
Leveling Up!
Now that I've made a few more orange peel blocks, I thought that I might make them into a medallion for the centre of a quilt.
Of course, then I needed to think about their layout.
This was my first thought.
Hmmm.
This was my second thought, which I prefer.
I had thought that I'd sash the blocks, after sewing them together into sets of four..... but actually I like these laid out as they are. They show the secondary circles better this way.
So, now I will sew them together and then add some borders - unless I sew them together and then decide to add some more orange peel blocks to make it larger. I love how fast they are to sew (I don't bother about pins and more or less get away with it) but I'm not keen on the cutting out. Always more decisions to make!
And the 'leveling up'? After decades of using spools of Aurifil, I've decided that I should invest in a cone stand. It will pay for itself in about two cones of thread, I estimate - and as a household that won't take much more than a year on current usage!
Of course, then I needed to think about their layout.
This was my first thought.
Hmmm.
This was my second thought, which I prefer.
I had thought that I'd sash the blocks, after sewing them together into sets of four..... but actually I like these laid out as they are. They show the secondary circles better this way.
So, now I will sew them together and then add some borders - unless I sew them together and then decide to add some more orange peel blocks to make it larger. I love how fast they are to sew (I don't bother about pins and more or less get away with it) but I'm not keen on the cutting out. Always more decisions to make!
And the 'leveling up'? After decades of using spools of Aurifil, I've decided that I should invest in a cone stand. It will pay for itself in about two cones of thread, I estimate - and as a household that won't take much more than a year on current usage!
Wednesday, 5 February 2020
Overwhelming Urge
You know when you get an overwhelming urge to do something or try something? My latent urge to make some orange peel blocks has emerged!
I've always liked the look of them, but have never given them a try, except, perhaps, as a Dear Jane type applique block.
I've seen several quilts with them recently. I was smitten. I wanted to have a go.
I sent off for some templates. I started cutting fabric. Oh my, that's a slow part of the process!
None of the layering up and multiple cuts at once that I'm used to. Each time a template was used I was having to place it carefully so as not to waste fabric. The block will finish at 6". So easy to machine stitch the gentle curves, but it means using yardage rather than scraps.
I'm having fun playing. These are the only completed blocks so far, and it won't be a quick process, but I'm having fun playing with the fabrics and thinking about different layouts.
Alongside this I've been making sure that my quilt records are up to date. Mine are only a basic presentation for each quilt that I make, of a photo, title, date of construction, and perhaps notes about the pattern and who the quilt is given to. Once that's complete, I'm going to do my regular computer file backup. I'll encourage you all to do the same too. Much better to have a backup of your files if you chosen technology does have a wobble!
I've always liked the look of them, but have never given them a try, except, perhaps, as a Dear Jane type applique block.
I've seen several quilts with them recently. I was smitten. I wanted to have a go.
I sent off for some templates. I started cutting fabric. Oh my, that's a slow part of the process!
None of the layering up and multiple cuts at once that I'm used to. Each time a template was used I was having to place it carefully so as not to waste fabric. The block will finish at 6". So easy to machine stitch the gentle curves, but it means using yardage rather than scraps.
I'm having fun playing. These are the only completed blocks so far, and it won't be a quick process, but I'm having fun playing with the fabrics and thinking about different layouts.
Alongside this I've been making sure that my quilt records are up to date. Mine are only a basic presentation for each quilt that I make, of a photo, title, date of construction, and perhaps notes about the pattern and who the quilt is given to. Once that's complete, I'm going to do my regular computer file backup. I'll encourage you all to do the same too. Much better to have a backup of your files if you chosen technology does have a wobble!
Tuesday, 28 January 2020
Bright Baby Quilt
I'm meaning that the colours are bright, rather than the baby, although that may well be true for whoever receives this quilt!
This is the back - a lovely Riley Blake zig zag.
Now the front is peeking - can you see how I played with the dots with the binding? Reversing the colours and changing the scale, it gives another bright colour.
This photo doesn't really do the bright colours justice! It is loud! It is proud! It makes me happy to see it!
Now I'm off to decide what to make next. The luxury of having no WIPS or UFOs (at least, that I can remember!).
Of course, it might be time to have a bit of a sort out of my scrap bins, which once again are bursting at the seams!
This is the back - a lovely Riley Blake zig zag.
Now the front is peeking - can you see how I played with the dots with the binding? Reversing the colours and changing the scale, it gives another bright colour.
This photo doesn't really do the bright colours justice! It is loud! It is proud! It makes me happy to see it!
Now I'm off to decide what to make next. The luxury of having no WIPS or UFOs (at least, that I can remember!).
Of course, it might be time to have a bit of a sort out of my scrap bins, which once again are bursting at the seams!
Wednesday, 22 January 2020
Twin Sisters - Mini Tutorial
Search the internet, and you'll find other better tutorials - this is as much to remind me what I did as for any other reason!
I decided to make oversized blocks - they finish at 14" square - and this is how I did it.
I cut 6 x background strips and 6 x feature fabrics strips - each of them 5.5" x width of fabric. (So a yard each of two fabrics would also work, with enough left for binding it).
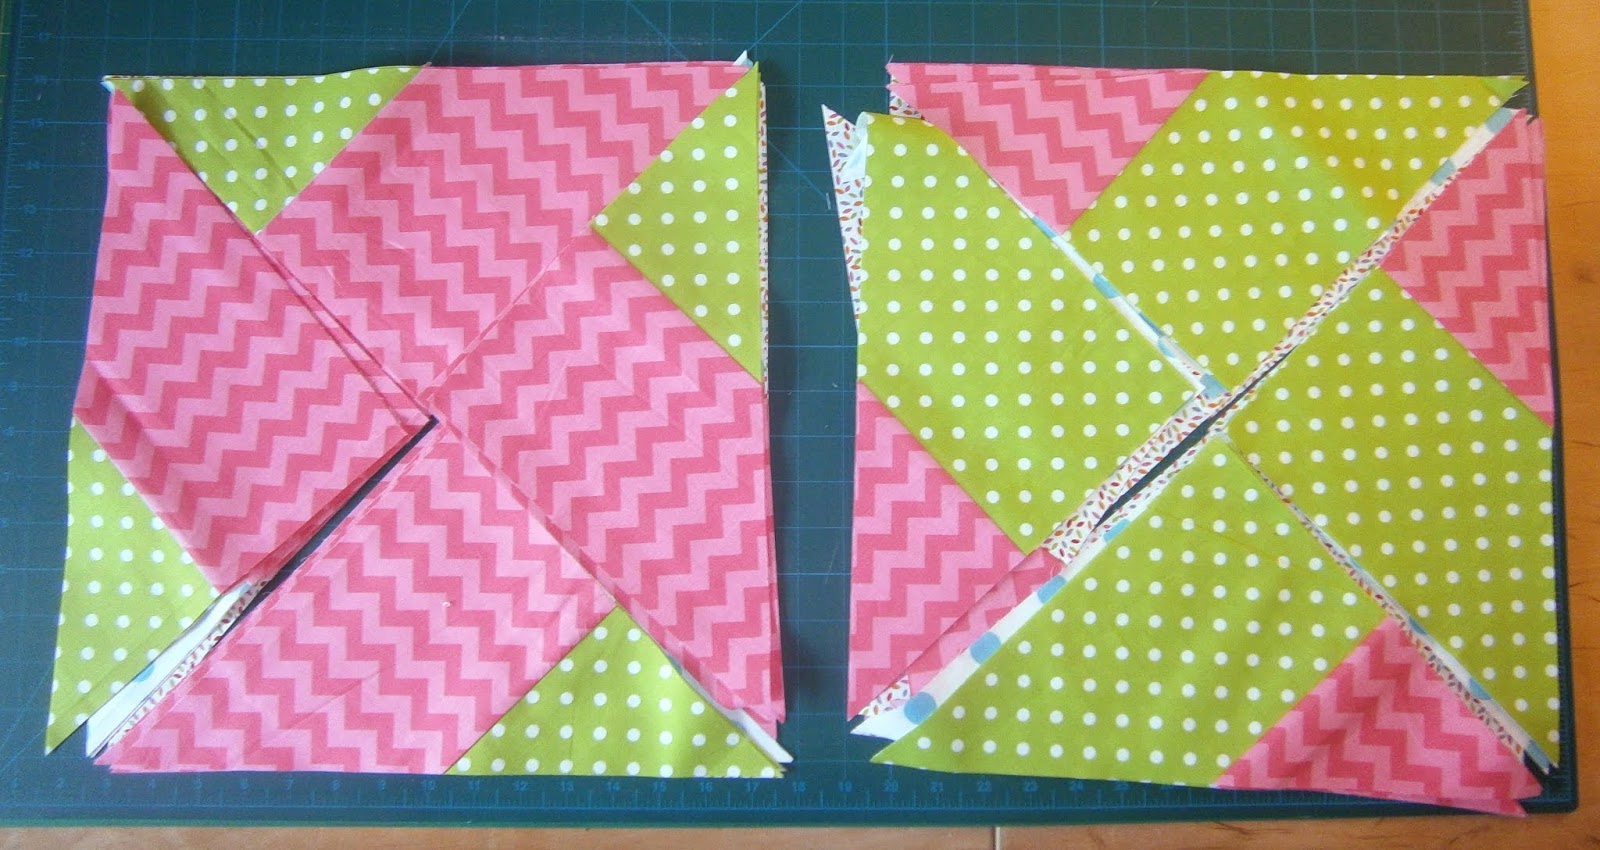
I sewed the fabrics together in pairs - one background (pink zig zag for me!) and one feature.
Next I subcut the pressed fabric pair strips into 10.5" squares with the background fabric closest to me, then cut them all diagonally from top left to the bottom right. It's important that they are all cut the same way!
Now arrange the HSTs into two 'windmill' blocks - one mostly background fabric, one mostly feature fabrics. You can see why they are called 'twin sisters' can't you?
Once they are sewn, arrange the blocks as you would like them. Mine are alternate.
I chose just three feature fabrics. Six might have been more fun, and I'd have scattered the block colours around more rather than making strips.
I think that this would also work in just two fabrics, and I might try that soon.
This gives a overall size of 42" x 562. Perfect cot quilt size.
Now all I have to do is back, quilt, bind and label it!
I decided to make oversized blocks - they finish at 14" square - and this is how I did it.
I cut 6 x background strips and 6 x feature fabrics strips - each of them 5.5" x width of fabric. (So a yard each of two fabrics would also work, with enough left for binding it).
I sewed the fabrics together in pairs - one background (pink zig zag for me!) and one feature.
Next I subcut the pressed fabric pair strips into 10.5" squares with the background fabric closest to me, then cut them all diagonally from top left to the bottom right. It's important that they are all cut the same way!
Now arrange the HSTs into two 'windmill' blocks - one mostly background fabric, one mostly feature fabrics. You can see why they are called 'twin sisters' can't you?
Once they are sewn, arrange the blocks as you would like them. Mine are alternate.
I chose just three feature fabrics. Six might have been more fun, and I'd have scattered the block colours around more rather than making strips.
I think that this would also work in just two fabrics, and I might try that soon.
This gives a overall size of 42" x 562. Perfect cot quilt size.
Now all I have to do is back, quilt, bind and label it!
Wednesday, 15 January 2020
Second Finish for the Year
You know when you come across a UFO, but you can't really remember much about it?
This is one of those.
Found on my shelves when I was tidying them (in order to store more fabric that I bought *by accident* in the New Year sales).
I can see why I didn't complete it - there is an awful lot wrong with it - but it wasn't going to anyone any good to be left in a folded heap on the shelf, so I got on and finished it!
So: fabrics that don't have enough contrast, odd shape, missing points, poor pressing during the process so that there are tucks on the front that are sewn in place, and a variety of different quilting patterns until I got one that I could manage with the drag of the brushed cotton backing! I confess all to the quilting police, and I'm still managing to look on the bright side. After all, this 30" x 50" (I know, isn't that odd proportions, what was I thinking?) quilt is now complete and can soon go to a charity to help keep someone warm. I shall move on to something different, with no nagging quilt sitting on my shoulder!
This is one of those.
Found on my shelves when I was tidying them (in order to store more fabric that I bought *by accident* in the New Year sales).
I can see why I didn't complete it - there is an awful lot wrong with it - but it wasn't going to anyone any good to be left in a folded heap on the shelf, so I got on and finished it!
So: fabrics that don't have enough contrast, odd shape, missing points, poor pressing during the process so that there are tucks on the front that are sewn in place, and a variety of different quilting patterns until I got one that I could manage with the drag of the brushed cotton backing! I confess all to the quilting police, and I'm still managing to look on the bright side. After all, this 30" x 50" (I know, isn't that odd proportions, what was I thinking?) quilt is now complete and can soon go to a charity to help keep someone warm. I shall move on to something different, with no nagging quilt sitting on my shoulder!
Wednesday, 8 January 2020
First Finish for 2020!
My first finish! Here shown as a flimsy. It's roughly 11.5" square.
I used part of a charm pack of Downton Abbey fabrics, a little white-on-white fabric, and some purple scraps for the setting and the outer border.
My accuracy is still something to be worked on, but some blocks were showing signs of improvement which is to be applauded!
And here is the finished item. Quilted, bound, hanging sleeve on the back.
I used a pattern from a book called 'Teeny-Tiny Quilts' by Donna Lynn Thomas.
I decided to try a decorative stitch pattern for the quilting. If I was to do it again, I'd stitch the straight line down the middle with large stitches, use it as a reference line, and remove it at the finish. I'd also work harder to get exactly the same start position for the pattern so that the lines were parallel - but that's why you try things out, isn't it? Without learning from it it would be a waste of an experience!
A good start for 2020, I'm going back to tackle a UFO next, I think.
I used part of a charm pack of Downton Abbey fabrics, a little white-on-white fabric, and some purple scraps for the setting and the outer border.
My accuracy is still something to be worked on, but some blocks were showing signs of improvement which is to be applauded!
And here is the finished item. Quilted, bound, hanging sleeve on the back.
I used a pattern from a book called 'Teeny-Tiny Quilts' by Donna Lynn Thomas.
I decided to try a decorative stitch pattern for the quilting. If I was to do it again, I'd stitch the straight line down the middle with large stitches, use it as a reference line, and remove it at the finish. I'd also work harder to get exactly the same start position for the pattern so that the lines were parallel - but that's why you try things out, isn't it? Without learning from it it would be a waste of an experience!
A good start for 2020, I'm going back to tackle a UFO next, I think.
Wednesday, 1 January 2020
Happy New Year!
Happy New Year! Wishing you all a very happy and healthy 2020!
Thought that I'd brag about two of my top Christmas presents today. The quilt holding gingerbread man is from my lovely friend Benta, who cleverly chose blocks from the mini sampler quilt that I made (thank you Kitty Wilkins) earlier in the year. You can see more about it and other personalised designs here.
The coaster is from my lovely friend Avril - a perfect spot to balance my cup of lemon and ginger tea when I'm crafting.
Two beautiful presents from two beautiful friends. I'm very lucky!
I'm also lucky to have had some time to do a little sewing. When I say little, I'm not kidding - I'm making another small quilt and have been strip piecing short lengths of 7/8" fabric together before sub cutting them..... watch out for photos in the next week or two!
Enjoy whatever crafting or sewing time you have too! Wishing you a very crafty New Year!
Thought that I'd brag about two of my top Christmas presents today. The quilt holding gingerbread man is from my lovely friend Benta, who cleverly chose blocks from the mini sampler quilt that I made (thank you Kitty Wilkins) earlier in the year. You can see more about it and other personalised designs here.
The coaster is from my lovely friend Avril - a perfect spot to balance my cup of lemon and ginger tea when I'm crafting.
Two beautiful presents from two beautiful friends. I'm very lucky!
I'm also lucky to have had some time to do a little sewing. When I say little, I'm not kidding - I'm making another small quilt and have been strip piecing short lengths of 7/8" fabric together before sub cutting them..... watch out for photos in the next week or two!
Enjoy whatever crafting or sewing time you have too! Wishing you a very crafty New Year!
Tuesday, 24 December 2019
Happy Christmas (and tiny houses)!
I was cutting it a bit fine for a last minute Christmas make, but wanted to make something with the teeny tiny buttons that I'd ordered after seeing Julia Gahagan's use of them.
I finished up with these four snow capped (well, almost) houses and Christmas trees.
I started with a strip of starry background and snowy foreground. Added in my shapes, covered them with netting, quilted around them...
.... decided to try and add snow to the roofs (not completely successfully, ahem), and machine embroidery for the house details, then cut them apart.
Then I tried to edge them neatly with a small satin stitch. Quite why it didn't occur to me to stick a layer of buckram in to stiffen them at this point I don't know. It would have made so much sense! I'm writing this now in case I what to make something similar in the future. Perhaps it will help me to remember!
The last thing I did was to hand stitch the buttons on (see top photo again). I will add a hanging loop to make them into tree decorations, I think. Just over 2" squareish. Next time I'll try for stiffer and smaller and make brooches!
Hope that you've found some crafting time too. Seasonal greetings to you all!
I finished up with these four snow capped (well, almost) houses and Christmas trees.
I started with a strip of starry background and snowy foreground. Added in my shapes, covered them with netting, quilted around them...
.... decided to try and add snow to the roofs (not completely successfully, ahem), and machine embroidery for the house details, then cut them apart.
Then I tried to edge them neatly with a small satin stitch. Quite why it didn't occur to me to stick a layer of buckram in to stiffen them at this point I don't know. It would have made so much sense! I'm writing this now in case I what to make something similar in the future. Perhaps it will help me to remember!
The last thing I did was to hand stitch the buttons on (see top photo again). I will add a hanging loop to make them into tree decorations, I think. Just over 2" squareish. Next time I'll try for stiffer and smaller and make brooches!
Hope that you've found some crafting time too. Seasonal greetings to you all!
Wednesday, 18 December 2019
Another Winter Quilt
This was another pattern that the generous Julia Gahagan shared at the workshop I took almost a fortnight ago.
I thought that I'd make it the same size as the winter scene that I showed last week - so they are both just under A4 size.
I think that I'd call this one a small quilt rather than a miniature. The pieces are small, but not tiny!
My baubles might be slightly lumpy, but I had a lot of fun making this and adding the machine stitching.
Time to hang them both, alongside my other Christmas quilts.
I thought that I'd make it the same size as the winter scene that I showed last week - so they are both just under A4 size.
I think that I'd call this one a small quilt rather than a miniature. The pieces are small, but not tiny!
My baubles might be slightly lumpy, but I had a lot of fun making this and adding the machine stitching.
Time to hang them both, alongside my other Christmas quilts.
Wednesday, 11 December 2019
Wonderland from a Workshop
I went to a quilting workshop with Julia Gahagan last week, where I made this miniature quilt (apart from the binding which I added once I got home).
It was a fun workshop learning this quick pictorial technique which uses a layer of netting over the top of fabric that you've temporarily held in place with fabric glue before quilting everything into place.
Fast, fun, and you manage to maintain sharp points in a way that I can't always manage with needle turn applique, or even fused applique if I've over sewn it.
Nice to come out with an almost finished snow scene, just before I put my Christmas quilts up!
It was a fun workshop learning this quick pictorial technique which uses a layer of netting over the top of fabric that you've temporarily held in place with fabric glue before quilting everything into place.
Fast, fun, and you manage to maintain sharp points in a way that I can't always manage with needle turn applique, or even fused applique if I've over sewn it.
Nice to come out with an almost finished snow scene, just before I put my Christmas quilts up!
Wednesday, 4 December 2019
Dino-tastic Christmas
Many thanks, Pintrest, for this dinosaur tilt on a Scandi inspired strip layout.
Used here in cross stitch to make a fun card for a young dinosaur enthusiast.
Life is all about finding the fun in small things, isn't it?
So, this is it for me this week. Small sewing, but fun sewing!
Welcome to December!
Used here in cross stitch to make a fun card for a young dinosaur enthusiast.
Life is all about finding the fun in small things, isn't it?
So, this is it for me this week. Small sewing, but fun sewing!
Welcome to December!
Tuesday, 26 November 2019
What 3 Words Quilt
Have you heard about What3Words?
It has 'addressed the world' by splitting the world into 3m squares and giving each a unique identifier of three words in a particular order.
As one of my favourite colours is purple, how happy was I to find that part of my living room has this identifier?
Admittedly, not as much use as when you are trying to find someone lost on a moor, or even finding someone in a festival or park, but it entertains me!
My first foray into words, I tried to match the style of the word look right for the word that they were. I know that there is a special name to describe that, but can't think of it right now!
I'm happy with the busy batik for the background, It was a fun to make!
It has 'addressed the world' by splitting the world into 3m squares and giving each a unique identifier of three words in a particular order.
As one of my favourite colours is purple, how happy was I to find that part of my living room has this identifier?
Admittedly, not as much use as when you are trying to find someone lost on a moor, or even finding someone in a festival or park, but it entertains me!
My first foray into words, I tried to match the style of the word look right for the word that they were. I know that there is a special name to describe that, but can't think of it right now!
I'm happy with the busy batik for the background, It was a fun to make!
Wednesday, 20 November 2019
Itty Bitty Backpacks!
Gotta love the internet - where you can see a designer in Australia making doll sized back packs (they finish at about 4" high) and for not very much money at all, get the pattern down loaded onto your computer in a moment!
So, thank you Jodie at RicRac! You can find the pattern in her Etsy shop here.
I started with one, spent some time looking for a missing bag of zips (still MIA). I wonder why my zips are missing, my DD2 wonders who would ever have a bag of zips.....
I sigh, and order more zips.
Another five back packs (they are cute and will be great at Christmas! These ones are - mostly - personalised), and another order of zips, this time in green and red..... The magic that usually ensures that you find the missing items just after you order replacements has failed me this time!
I don't do heaps of festive sewing, but these are too fun not to make in a seasonal fabric or two!
So, thank you Jodie at RicRac! You can find the pattern in her Etsy shop here.
I started with one, spent some time looking for a missing bag of zips (still MIA). I wonder why my zips are missing, my DD2 wonders who would ever have a bag of zips.....
I sigh, and order more zips.
Another five back packs (they are cute and will be great at Christmas! These ones are - mostly - personalised), and another order of zips, this time in green and red..... The magic that usually ensures that you find the missing items just after you order replacements has failed me this time!
I don't do heaps of festive sewing, but these are too fun not to make in a seasonal fabric or two!
Tuesday, 12 November 2019
Anne Kelly Workshop Fun
On Sunday I went to a workshop with Anne Kelly, organised by Richmond and Kew Quilters.
Anne encouraged us to use vintage textiles, such as embroidered tableclothes or tray cloths, which are unlikely to be used in their current form, and add to them.
We block printed. We coloured our prints with Sharpies. We cut out floral motifs. We added 'middle ground' pieces. This is shown in this first photo.
I 'broke the rules' and extended mine to meet the criteria for a group quilting challenge (making a suitable background for a blackbird pin - you can see it below).
After a six hour workshop and a further 2/5 hours at home, I'm thrilled to present my cottage garden piece, which is slightly over A3 size.
The central 'heart' will be a place to put badges or pins as I choose. I quite like the idea of something rude about the concept of Brexit but in the same style as the garden....but there are other contenders, and my 'Enthusiast' pin is a good place marker for the moment.
Anne was a great tutor - encouraging us all to follow our own whims. It will be lovely to see the other pieces of work started at the workshop as they are finished and shown at our group meetings.
Anne encouraged us to use vintage textiles, such as embroidered tableclothes or tray cloths, which are unlikely to be used in their current form, and add to them.
We block printed. We coloured our prints with Sharpies. We cut out floral motifs. We added 'middle ground' pieces. This is shown in this first photo.
I 'broke the rules' and extended mine to meet the criteria for a group quilting challenge (making a suitable background for a blackbird pin - you can see it below).
After a six hour workshop and a further 2/5 hours at home, I'm thrilled to present my cottage garden piece, which is slightly over A3 size.
The central 'heart' will be a place to put badges or pins as I choose. I quite like the idea of something rude about the concept of Brexit but in the same style as the garden....but there are other contenders, and my 'Enthusiast' pin is a good place marker for the moment.
Anne was a great tutor - encouraging us all to follow our own whims. It will be lovely to see the other pieces of work started at the workshop as they are finished and shown at our group meetings.
Subscribe to:
Posts (Atom)