Wednesday, 8 March 2023

Loving Online Learning

I enjoy learning from other people - and the internet gives us amazing access to generous individuals who share all sorts of information.

This is my first attempt at sashiko, using a pattern and explanation (called Komezashi - Heart) by Zen stitching (www.zenstitching.ca) .  Their tag line is 'The art of mindful mending' - but what they offer seems to be more than that!

As you can see, I didn't mend with mine, just made a small wall hanging (approx 8" square) using the corner of a vintage tray cloth and some new Je Ne Sais Quoi print that I'd treated myself to recently.

My other on line learning was with a taster weekend with a new online teaching venture called The Thread House.  This particular class was by Karen Lewis, who taught us how to make a folded top pouch.  Turns out that I had just the right size lining fabric (the back of an old shirt) to make two, and the perfect outer fabric to pair with it.
Simple construction, you can fancy it up by using orphan blocks or adding applique to the outer layer - but this time I just went for the simplest option.
I even had a toning long scrap to make the bag ties out of.  It always makes me happy when that happens!


So, big thanks to everyone who shares their knowledge and time on line.  I sometimes sign up for longer courses or workshops - after all, these taster tutorials are often to showcase teaching styles so that you can see whether you enjoy it or not, and the people who are making this content need to make a living - or sometimes buy a book by the person.  I love the chance to try things out first, though.  Thanks!
 

Wednesday, 1 March 2023

Fourth Orphan Block Project Complete


This time it was a small pile of hexagon fabrics that attracted the magpie within me!

First I sewed them into rosettes, then tried layouts with what a had until I was satisfied.

Then I had to sew them together - when I remembered why I wasn't, at heart, an English Paper Piecer!
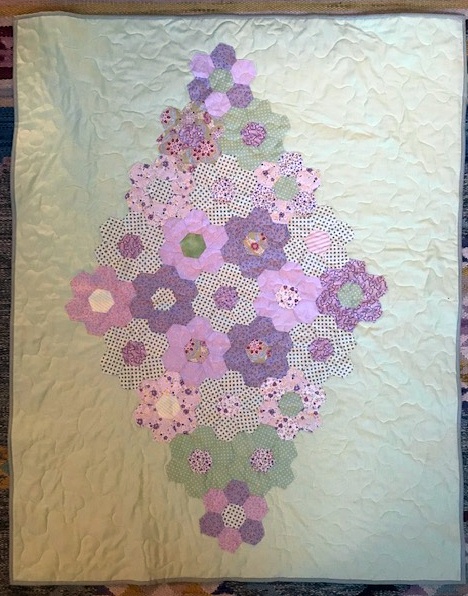
Next I found a plain background fabric - luckily this pale green was not just the right shade, more or less, but also the right size.

I applied the lozenge of hexies onto the background - first pinning, then sewing around the outside edge with the sewing machine, taking out the tacked edge papers as I went.
Then it was time to flip it over and cut away the excess base fabric, exposing the rear of the hexies.
Time to take the rest of those papers out!
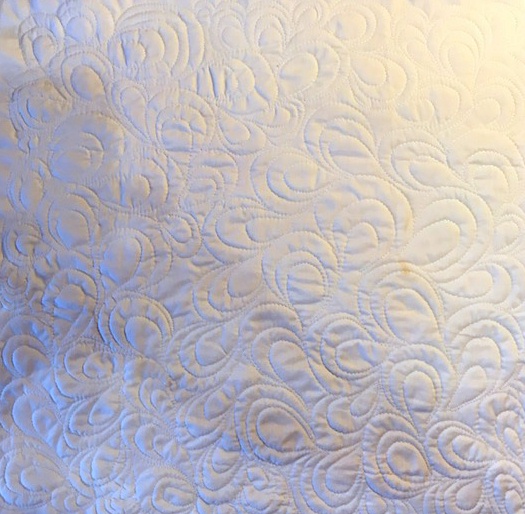
A simple job after that to back and baste it (it is a cot quilt, so I was even able to do this on the kitchen table!), quilt and bind it.

A finished quilt, roughly 33" x 42".

I'm pleased that it's complete - and pleased that I had almost exactly the right number of hexies supplied in order to make this layout.  Just six hexagons of fabric left, that will make a fun decoration on something else.......

Wednesday, 22 February 2023

More Small Projects

I mentioned Julia Gahagan last week - in fact my blog is lagging a little, as I took part in her workshop at the end of January!

These were the items that I created during three hours in a Zoom workshop with her.

First of all a book mark and card topper ( actually I made the card topper first, realised how much my top layer knocked the colours of the collage back, so tried a bookmark with more saturated colours.

These are the backs so you can see the quilting.

Fun to use the fancy stitches on the machine in a straightforward way to add interest to the back ground.

As you can see, my little bird is a little clumsy, but I gave it my best shot without using any tracing or marking.....

This was the A4 piece that I made during the workshop.

Again, I went for saturated colours, on the whole, that toned with the vintage embroidery taken from a tray cloth.

Fun to add so many different elements to a small peice.

Again, this is the reverse to show the quilting.
The day after the workshop, whilst I still had my scraps out and a good memory of what we'd been encouraged to to, I made this A4 piece.

Again, using the vintage tray cloth as a centre piece to it, and this time personalising the FMQ embellishment.


The following day I was still enthusiastic - and with all the scraps still out, decided to make three more card toppers!  I stuck with fairly neutral backgrounds for these three, and with so few pieces on each card, I decided that I didn't need the overlay for them. 


I'm pleased with all of these pieces.  I'm sure that 'proper' artists would do even better with the composition, but I'm happy that I've done the best I could without spending too much time stressing over it!

Wednesday, 15 February 2023

Third Orphan Block Project Complete

My next orphan block project is complete!

I've added to the chequerboard pieces to make a cover for a ring binder.

The blue stripy fabric was a little loose and wiggley - even with starch I couldn't really tame it - but I decided not to worry about that!

This is the front.  I embellished with a line drawing design based on one shared by  Julia Gahagan in a recent workshop.

It fitted the space really well.

This is the whole item opened out.
And the bird shown from the reverse, so you can see it more clearly.
These were the start point.  Making them into 4 x 6 blocks took them to close to A4 size, with the loss of a couple of triangles and the addition of two more coloured squares.

Another fun project to complete!
 

Wednesday, 8 February 2023

Second Orphan Block Project Complete


A simple project this one, based on a couple of strips of charm squares that I'd picked up from the orphan blocks table.

I think that the fabric range is from Janet Clare.

I had just the right number of squares to make a chequerboard 16-patch.

Which was easy to add a narrow border to, in the same fabric that I used to make an envelope back for it.
Difficult to see the quilting, but it was an 'oyster shell' pattern - easy to sew, nice and flowing, and relevant to the maritime theme of the fabrics.

My DD2 was utterly charmed by it, and it's nestling with the other cushions and quilts in her room.

Thank you, kind donor of the blocks! 

Wednesday, 1 February 2023

First Orphan Project Complete!

So I showed you the orphan blocks that I'd picked up from my quilt group.

Here is my first completed project with them!

This applique is my response to the charming fabric that was used in the three blocks that I'd acquired.

Here is a reminder of the original.
I put them together with sashing - nature themed, but I hadn't got anything with more fungi or a woodland theme.

This would have made a cushion cover, but I remembered that I had a fleece on hand, so I thought that I'd extend it into a lap quilt size and see how I got on with making it into a two layer coverlet.

To be honest, I think that I've concluded that I don't really like it!  I felt inhibited from quilting it in the way that I usually would, and although it's joined securely on the vertical seams, I'm not sure that it would still lay flat if I went to work on it with some FMQ, or even some walking foot lines.

So, an interesting experiment resulting in a cosy lapquilt (and a scarf with the fleece off cut!), but not something that I'll repeat in a hurry!  I think that I like the stability of a woven third layer!

It finished at 44" square.
 

Wednesday, 25 January 2023

Orphan Blocks

At our recent quilt group meeting (Richmond and Kew Quilters - come along on month and meet us!) we all took our orphan blocks in, and were able to pick up blocks from other people that we thought we might be able to add to / use in some way.

I've come home with a great haul!

Three blocks (are they kaleidoscope blocks?) with this pretty and quirky toadstool print.

A length of maritime themed fabrics joined together.
A selection of blocks relating to 16-patches.


And finally, a bag of mostly hexagons, with a few other shapes thrown in too.


I can't wait to get started on devising projects to use these orphans.  Always fun to be using someone else's cast offs!

Wednesday, 18 January 2023

It's a Cover Up!

I was lucky enough to get a free improv idea / pattern from Brenda Gael Smith as I'm a newsletter subscriber (the best way to find out about planned virtual workshops with her - she's a great teacher!).  Thank you, Brenda!

It was perfect timing, as I love the chance to try a new to me technique, and this wasn't too challenging for me, and I also wanted to make a small table topper.

Why did I need to make a topper?


Well, look at this - we decided we wanted to keep an additional side table available in our living room, but look at it!

It hasn't been treated kindly over the years of being the table we've stood our Christmas tree on - and the spillages of water related to that (can you see that in that time we've had both square and round holders!?!).

So much nicer to look at my dashed lines - even if my family are calling it a five lane highway!

I had great fun making this 15" x 18" topper.
 

Wednesday, 11 January 2023

Lucky Me!

Happy New Year!

I'm just catching up with myself after the festive season (which included a household full of flu too - slightly less festive!).

Isn't this gorgous?  An EPP medallion appliqued on to a tote bag - in just my colours!  A masterpiece by Benta!

And there was more in my Christmas bundle of goodies  - she'd also made this garland of lights for me.....
.....shown here decorating my shelves....
.....as well as this lovely Christmas 'ginger'!  Fabulous presents, thank you, Benta!
And also on a sewing theme, my secret Santa present.

Wrapped up.....

.....and unwrapped - a beautiful paid of scissors, in the shape of a unicorn pegasus (or whatever the correct term is for a winged unicorn!).  Perfect for my new Quilt Group folder / holder.  Thank you, Secret Santa!
 

Wednesday, 28 December 2022

Now I can show you.....

Now that the Big Day is past (Season's Greetings, by the way!) I can show you this little mini that I made and gifted to Benta.

I used a Bernina free pattern as the start point, which you can find here  but made the bird houses with different Christmas fabrics, and added the other motifs to fit the theme.

The quilting was a simple free motion meander, shown here on the back (which was pale green, rather than the white that it looks here!).
Neatly rolled into a sausage shape around it's hanging pole (I'd added triangles to hang it by when I put on the binding, no photo of them though), I had a scrap of fabric to make the perfect sized fabric bag for it.

I hope you like it, Benta!

And to everyone who reads this, Happy New Year!

I wish you all the best for a happy and healthy 2023.
 

Wednesday, 21 December 2022

Finished is better than Perfect!

I sewed the eight parts of my mariners compass together, then inserted them into a dark grey background.

The insertion wasn't too bad, but some of the bits inside the compass weren't quite perfect!  Not to worry - I'm still quite proud of the overall effect!

My DD2 spotted it and quite fancied it for her room.  In a blink of an eye it had a border (to make it match the size of a spare cushion that I had!), some very simple quilting (shown on the back of it here), and then a envelope back added.

 Finished!  One more cushion cover, happily received into DD2's room!

I'm pleased that I don't have it as an unfinished project, she's pleased that she has an additional cushion.  Happiness all round!

Wednesday, 7 December 2022

Tis the Season!

Another Zoom date with my Miniature Quilt Group (special interest group of the Quilters Guild of the British Isles)!

This one, led by Corinne Curtis (thank you Corrinne!).  You can see more of her work here.


She encouraged us to make a small quilt sandwich, and either 'quilt as you go' with strips (I used decorative stitches, but needed plainer fabric for them to show up better) or free motion quilt mini pictures on them.  She also told us how to partly cut the shape to insert a ribbon loop before doing all the stitching, which was a fab tip!

We all had fun!

And this was the result of a talk by Joy Harber (nee Salvage) about her amazing quilts, when she also described making log cabin blocks using a chain pieced strip method.  No foundation, just using strips 3/4" wide and working round the central square.

I loved making this, but can't imagine making the quantities that Joy does to make large quilts.  This is a coaster size and that suits me just fine!


 My final festive flourish was to make a couple of hot water bottle covers, ready for the chilliness of winter!  I think that they are going to be well used this season!

Wednesday, 30 November 2022

Mariners Compass Workshop

Recently I took an online workshop (through the Miniatures Group of the Quilters Guild, UK).  Or at least, the first part and then some 'homework'.  Unfortunately I'm going to miss the second part of this class with Judi O'May, which is a shame, as I really enjoyed the first part, and would have enjoyed getting her tips on how to complete the compass!

Still, here are a couple of 'process' shots.

You can see that I had neat stacks of fabric pieces under card templates - all labelled up with what piece number it was (and how many I had to cut and which colour - there was a lot of info on some of those tiny peices!).

I meant that I could lift up the bits that I needed in order to apply them to the paper foundation pieces.

You can see the start of one of the segments here.

After about 8 hours work, I'd completed 8 segments of a mariners compass block.  

Are the perfect? Not quite.  But am I concerned? No, not at all! It still looks great to me.  Feels like years since I last made one, and I'm pretty sure that these 192 pieces of fabric show more points than I've attempted in the past!

I'll let you look at it again once I've made more progress!