Wednesday, 14 July 2021

More Scraps make a Quilt

From a whole heap of orphan blocks and scraps, this is what has emerged!

I'm pleased with it!  Using up bits and bobs from years ago as well as some that are only a year old.  Curiously satisfying!


There is raw edge applique, piecing with various degrees of complexity, hand stitched embroidery, ends of strip sets and good plain scraps.


Some of the blocks went together well, and I was pleased with how the original work had been undertaken.  This 'orange peel' coming into the corner so nicely, for example.
Other areas, like the points on this star (made more years ago than I can remember) are not something to be proud of!  However, I love the colours and the work that went into it, even if at the time I hadn't made it very accurately!  So, in it went!

It was very liberating to use up all these bits and bobs.

I stitch all my quilts with love.

This little bit of quilting made that more literal than usual!  The plain space just needed a little something extra to the loose stipple that the rest of it has.

Colourful paisley borders.

Backing and binding of a cartoon cat.

Finishing at 40" x 42" it's not huge, but enough to give a little snuggle to someone through Project Linus, I hope.
 

Wednesday, 7 July 2021

Another Quilt Complete!

More delving into the scrap drawers!

The central panel was a small heap of half square triangles, which I made into pin wheels.

Then I hunted for more fabric scraps that might play nicely with them.

The grey background all came from trimmings from another quilt made some time ago.


The red strips were the only parts that needed to come from anywhere other than the scraps pile.

I was quite pleased with this finish of 44" x 40".

Backed with a blue polka dot fabric, and bound with  another bluey grey solid.

Puffy quilting.  Not my best work, but more progress though the scraps, which is good for the soul!
 

Wednesday, 30 June 2021

Placement Matters!

I wanted to try a micro mini disappearing 9 Patch (they each finished 2.5" square).

I used the same amount of fabric for both.  A nine patch with a red centre, and four squares each of grey and white.

In this one, the grey squares were in the middle of each strip, making the cross shape. with the white squares in the corners.  I wasn't altogether pleased with it.

In the second one, I reversed the placement of the grey and white squares.

This was much more what I wanted it to look like.  Isn't it amazing how just placing the fabric in a different way can have such a different outcome?

Isn't it great to be able to keep on learning?

I've also learnt that 'disappearing' blocks where the resulting pieces are of such different sizes don't really work for micro minis.  Useful to realise!


I thought that I'd try another placement experiment - although this time I didn't do it 'properly' with the same fussy cut focus piece in the middle.

I made the economy block - each finishing at 1.5" square.

Less dramatic difference this time!  I think that a chequerboard quilt make of these would be lovely.

Now that I'm tying this, I realise that I've actually made two chequerboard quilts with this block, one for each of my daughters to welcome them to the world!  Crikey! Sixteen and eighteen years ago - doesn't time fly!
 

Wednesday, 23 June 2021

Mini Makes

The scrap use continues!

This time a range of mini pieces - including one that I'd stitched on - were put together in a mini piece, which I then extended with some glorious batik to make into a book cover.
Matching flaps to hold the notebook in place.
This is the whole cover.

Lots of fun to make, and already gifted to a good friend.
More 'pre-cut' scraps.

Turns out that I had more bunting triangles tucked away in my scraps drawer than I had realised.

So, it was time to get the twill tape out and get making.
Fast and fun.

It didn't take long to make two strings of bunting.  One is 12' long, one is 18' long.

Aren't the fabrics pretty?  I have no idea why I didn't make the bunting at the time that I cut them out.  Funny how some projects just get side-shifted by accident, isn't it?
Here is one string, neatly folded.

So satisfying.

And only slightly reminiscent of Picasso's 'Bulls Head' (you know, the one with the bicycle saddle and handlebars).

My progress through the scrap drawers continues!
 

Tuesday, 15 June 2021

Dresden Delight

In my scraps were some cut, but unsewn, Dresden plate blades.  I put them together and appliqued them to a backing fabric.  Then surrounded them with strips made from the remaining blades.  Then squared them up with some dotty fabric.

Then I put the whole medallion on point in some cherry blossom fabric.

It's all very sweet and quite retro feeling.
I backed it with a vintage style floral, with a strip of that blue dotty fabric and a smaller piece of cherry blossom.

Bound with more of the blue polka dots.

I quilted it with 'petals' on the Dresden (you can just about see it here) and a large stipple on the rest of it.
Doesn't it look perfect for a summer throw?

Only about 50" square, but cute as anything!
You can get an idea of the prints and scale of them here.

No worry about who to gift this one to.  I asked DD2 to hold it for me so I could take a photograph of it.  She carried on holding it, and it's disappeared into her room.  In fairness, she did ask if that was OK!

More fabric bits removed from my scrap drawers!
 

Tuesday, 8 June 2021

Back to Full Size


I've started on the 2021 excursion into my scrap drawers.  It seems to be an annual event!  I really don't know how I seem to amass so many - or why I've so far failed to get them down to zero!

Actually, I might know the answer to that.  I always like to have a few scraps around to use for applique and patches (and micro minis, it turns out!).  So getting to completely empty scrap drawers might not be a real concern for me, just having them with enough space that I can fit in what I have left over at the end of a project!

I don't think that I'll ever get over the pleasure from turning scraps into blocks like these, and then these blocks into a quilt!

I had to piece the back too, and these prints worked well.
Utility quilting, and then, just like that, the quilt was bound and ready for snuggling under!

Off to choose the next scraps to add sewing alchemy to!

Tuesday, 1 June 2021

More Micro Mini Fun

More teeny tiny quilts for the gallery this week!

First of all I made two small hexie quilts.

Tricky to find prints in my collection that were small enough for the fussy cut centres.

The pink framed one is 1.5" square.

This blue framed one is 1.75" square.
Then I went back to some piecing instead.

This one is another 1.75" square.


This one, a disappearing four patch, is just a smidge larger.  I think that I missed trimming it properly, as it looks a bit skewwhiff! 


I've thoroughly enjoyed my play with micro mini quilts this month.  The gallery is rather over full (the best ones always manage to have delights in storage so that the rooms can be refreshed now and then - mine will be no exception!).

Thanks to Berry Birdy for the idea!
 

Wednesday, 26 May 2021

(Mini) Gallery Opening (or how to spend time in the most delicious way!)

Yes!  My own mini gallery!

Turns out that all you need to have a gallery opening is a little time, an old mailing box and a sense of fun!

Many thanks are due to Leslie of Berry Birdy who set me off down this creative rabbit hole.  Find her on instagram and then you can see lots of other micro mini quilts too!


These were my first two foray's into the microminisal (sew along).  The idea was to create quilts that were 2" or less (or was it 2.5"? I'm not sure).

The pale pink star was my first attemplet, but I wasn't very pleased with the lumpy binding.

The dark pink star came next, with a neater binding.
Then I went slightly ambitious and tried my hand at a bargello (and made a smaller 'flip' quilt with the leftovers).
By now I needed a gallery space for them, of course!

Leslie herself made a gallery in a drawer - so cute - but I wanted something that would pack up easily.

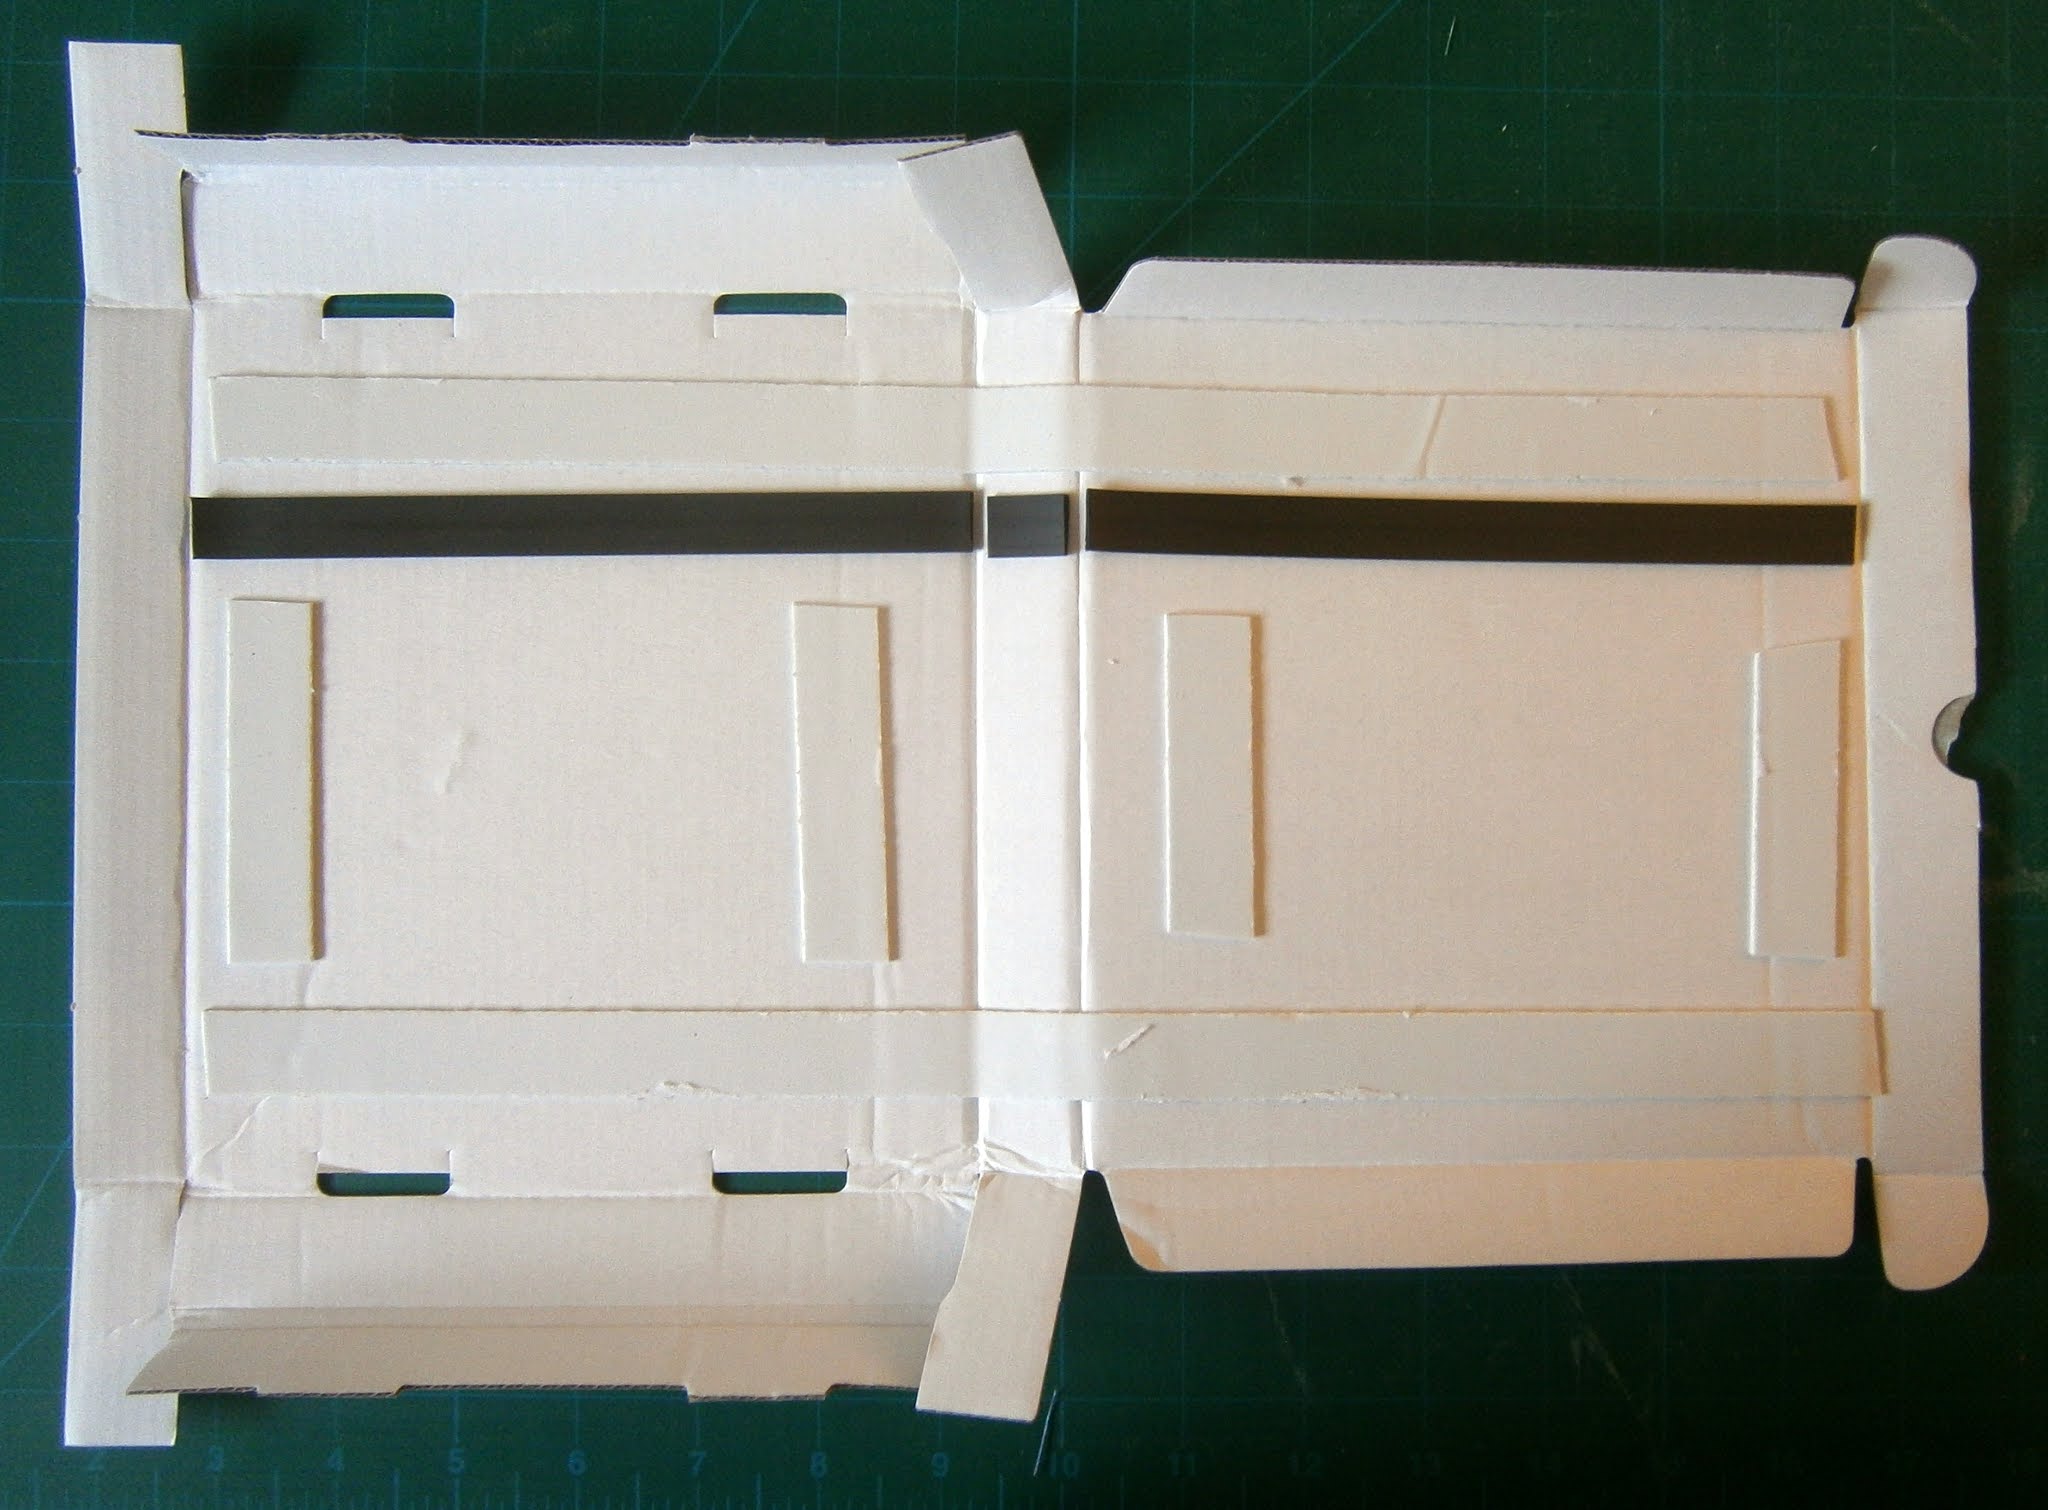
I grabbed a mailer box and some magnetic tape.
Then added some foam tape.  This means that the quilts should invisibly hang on the metal hangers on the magnetic strip (and allow for gallery rearrangements!) but that the walls will stay vertical with the support of the foam tape.
Then I added the paper walls.  

Later, I printed out a sign (and an A board to let visitors know that the gallery was open.  Oh, and then I quilted a floor too.
What then?  More micro minis.  Sorry for the poor photo quality - but this one had a fussy cut centre, and finished at 3/4" square.

The biggest challenge will be not to lose it!
Then another that was a refreshingly large 2" square medallion quilt.
Yesterday I made a hexie quilt, but at 2.5" square it's almost too big for the gallery, cute though it is!

I plan to try and find some smaller hexie papers (or make some) to see if I can make one that is a little smaller.

Can you tell that I'm having fun?  

If you have a few spare minutes and some fabric scraps I can heartily recommend it!
 

Wednesday, 19 May 2021

Completed Avery Garland Cushion

Remember that I was working on this?  Work continued, and here is the completed cushion cover.

I finished the hand applique, backed, basted and quilted it, then finished it with an envelope backing.

I followed the lines on the background fabric to cross hatch the middle of the garland.  I quite like the look, but not enough to continue it on the outside of the ring, where there would have been an awful lot of stopping and starting!

The back of the cushion cover was made with my scant remains of the background fabric, with some almost matching blue in the middle.  

Show in it's un-ironed state here, I was quite pleased the overall use of fabric, given what I had left of the diamond pattern one.

 And here it is, in it's full glory.  A 25" square cushion!
 

Fun to make, and I daresay it will be used in the garden over the summer.

Jo Avery made an easy to follow project that was fun to do.

On to my next project now - I've decided to make some simple star blocks with some of my scraps.

Wednesday, 12 May 2021

Another Quilt Finished!

I completed this 'square in a square' quilt that I started a couple of weeks ago.

Blocks were joined into strips, strips were joined into a quilt top, a backing was made, wadding cut to size, basting happened.....it take a lot to get from some patchwork blocks into something that is layered and ready to quilt, doesn't it?

Then it was quilted with a loose stipple, bound in the last of the bright pink zig zag, and finished!

You can see here the paisley that I chose for the backing, and plain pale pink that I used in an inserted strip to bring it up to the right size.

It's bright and fun, and I hope that someone enjoys it!  

I suspect that it might find a place in my quilt heap for the moment (it's quite chilly when you are trying to enjoy a cuppa with friends outside this month) although ultimately it will be given away.
 

Finished it was 54" square - perfect for a lap quilt!

Wednesday, 5 May 2021

From Scraps to Products!

You know what it's like.  You put scraps to one side until you have time to deal with them, then end up with the drawers not closing before you know it!
It was time to address them again!

It leaves me feeling quite smug once they are coming into order by being cut to standard sizes, ready to use when I next fancy a scrappy project.

I cut into 10" squares, 5" squares, 3.5" squares, 1.5" squares and 2.5" strips.  Anything that doesn't match those (or where a cut would seem too wasteful) gets put into a colour themed bag.

This time I added another couple of measurements to cut to, and cut some pieces to make into re-usable tissue holders.
By cutting at 5.5" x 7.5" (inner and opening 'flash') and 5.5" x 6.5" (outer), then pairing and sewing them together, I ended up with this sort of thing.  A quick press, the two end seams sewn, and then the cover is ready to be turned through and filled.
Before I knew it I'd made 40!

What a delightful tumble of them!

And here they are in their serried ranks (missing one to a family member already!).  I daresay that they will raise a few pounds for a charity.


Fun to make something a little different.
 

Wednesday, 28 April 2021

Another small piece in progress

I'm flip flopping between projects at the moment.

I'm making another cushion cover, this time with some paper piecing.

It's a pattern by Jo Avery called the Avery Garland.

You can see her lovely work here.

Of course, in her quilt she repeats the make 9 times, but I'm only creating it once to make my cushion cover.

I've chosen to make mine in some of my favourite batiks

The paper piecing complete, it's time to add the applique.

Here are the parts ready to add

And here is the first stem.  A bit more work to do before it's ready to be quilted, but now I feel that I'm well on the road with it.  Time to check whether I have a spare cushion pad that is the right size!