Wednesday, 26 May 2021

(Mini) Gallery Opening (or how to spend time in the most delicious way!)

Yes!  My own mini gallery!

Turns out that all you need to have a gallery opening is a little time, an old mailing box and a sense of fun!

Many thanks are due to Leslie of Berry Birdy who set me off down this creative rabbit hole.  Find her on instagram and then you can see lots of other micro mini quilts too!


These were my first two foray's into the microminisal (sew along).  The idea was to create quilts that were 2" or less (or was it 2.5"? I'm not sure).

The pale pink star was my first attemplet, but I wasn't very pleased with the lumpy binding.

The dark pink star came next, with a neater binding.
Then I went slightly ambitious and tried my hand at a bargello (and made a smaller 'flip' quilt with the leftovers).
By now I needed a gallery space for them, of course!

Leslie herself made a gallery in a drawer - so cute - but I wanted something that would pack up easily.

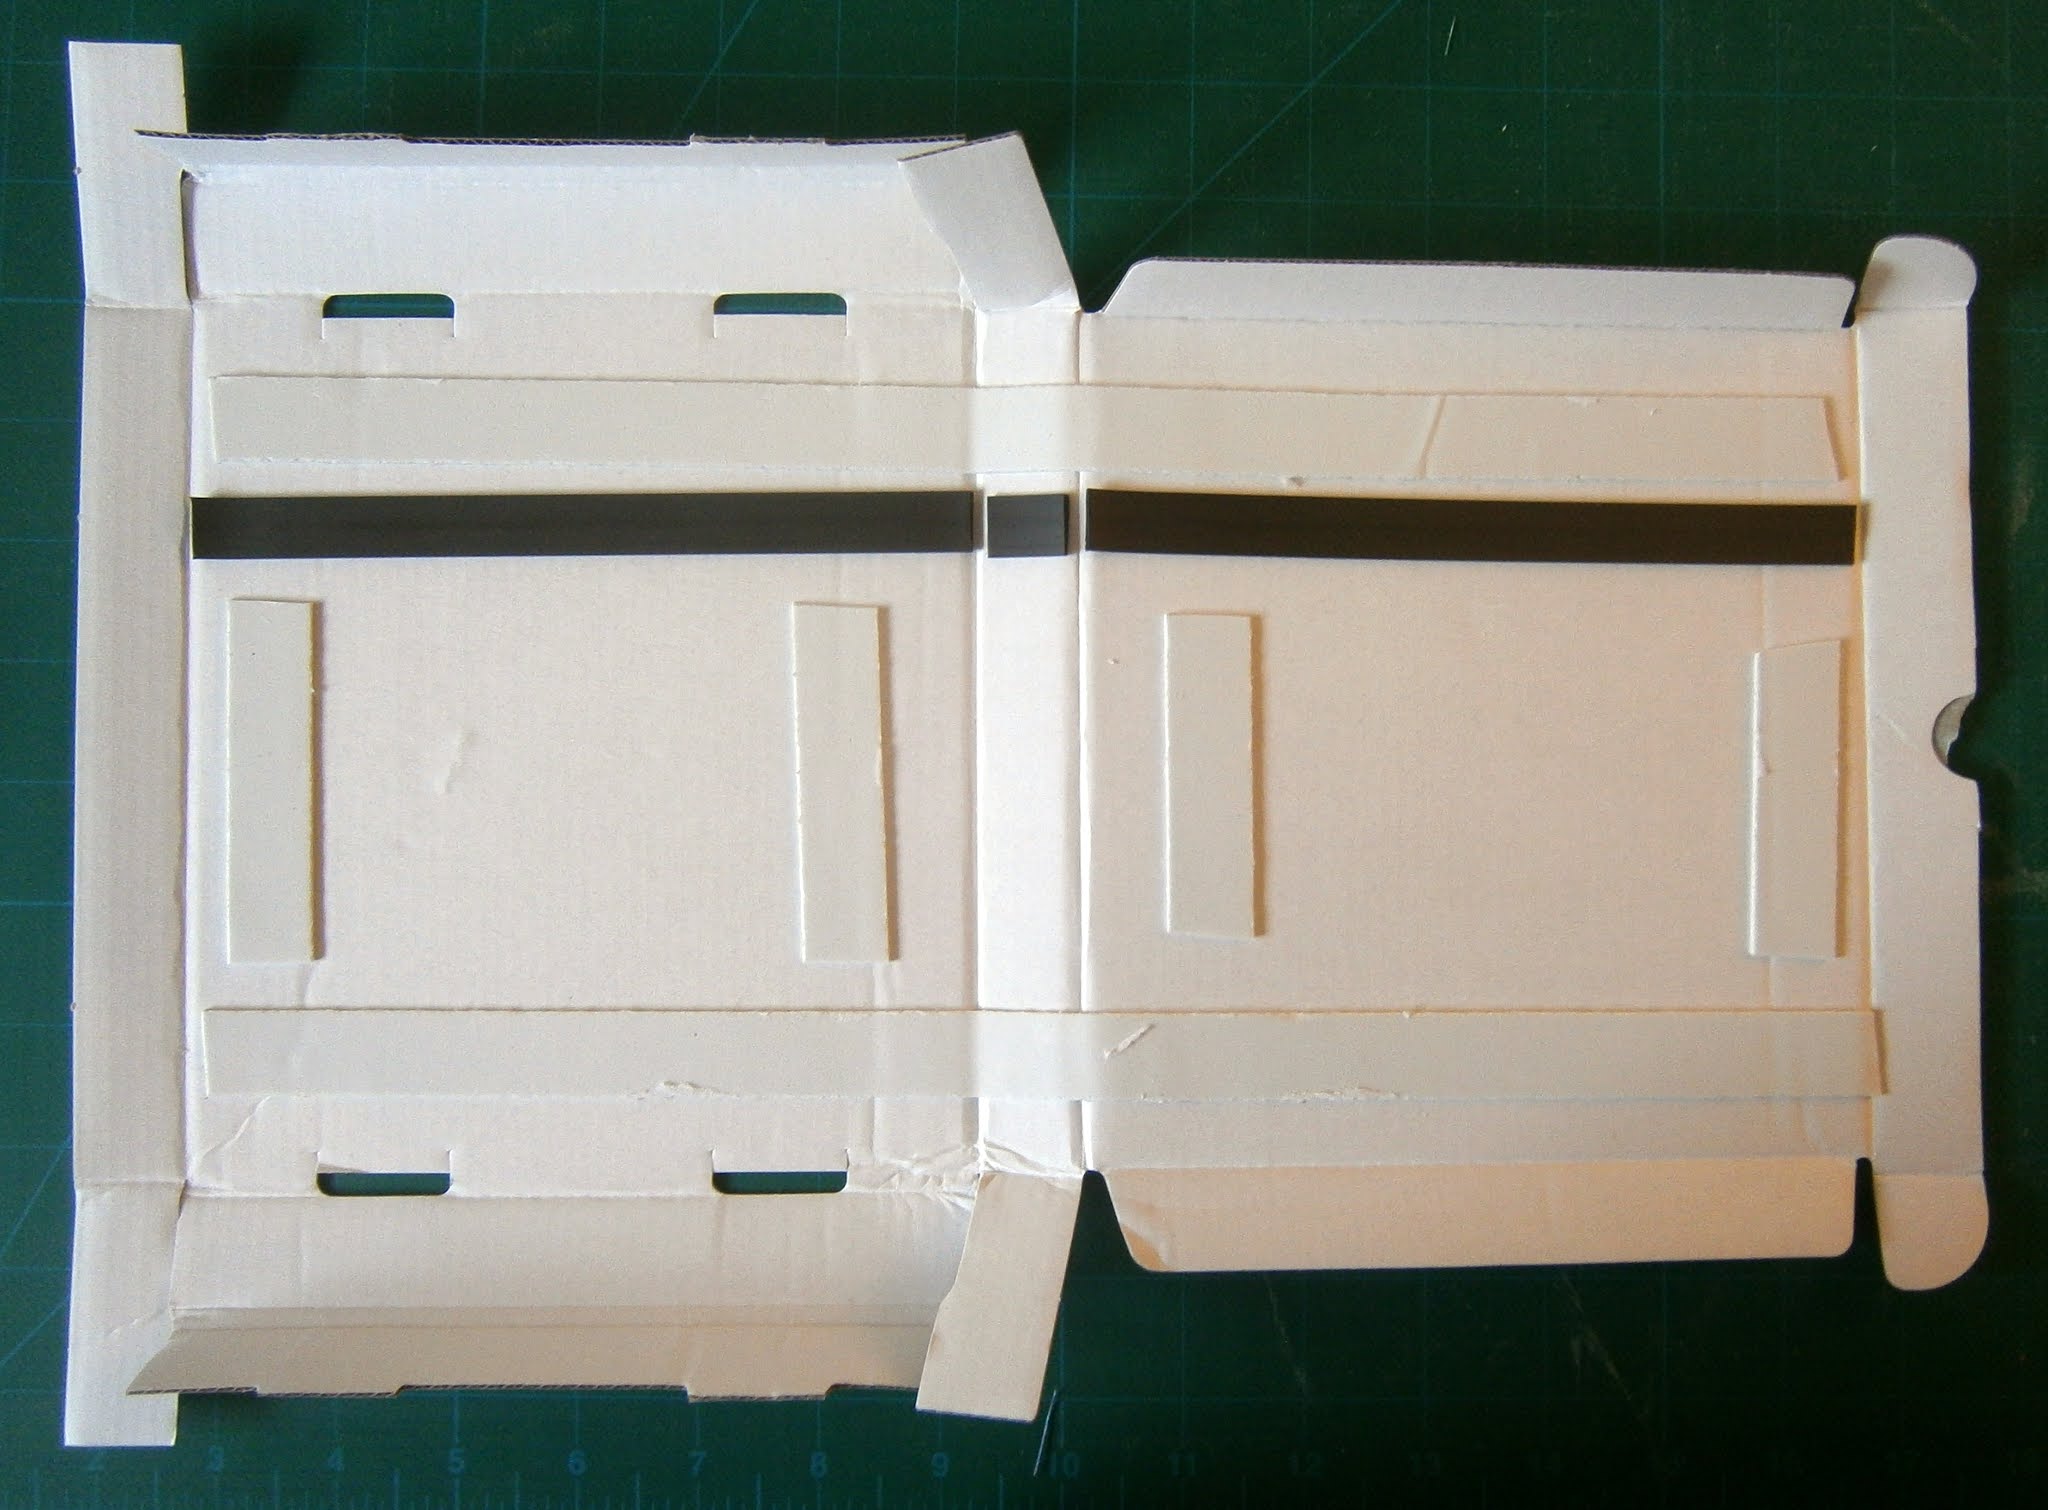
I grabbed a mailer box and some magnetic tape.
Then added some foam tape.  This means that the quilts should invisibly hang on the metal hangers on the magnetic strip (and allow for gallery rearrangements!) but that the walls will stay vertical with the support of the foam tape.
Then I added the paper walls.  
Later, I printed out a sign (and an A board to let visitors know that the gallery was open.  Oh, and then I quilted a floor too.
What then?  More micro minis.  Sorry for the poor photo quality - but this one had a fussy cut centre, and finished at 3/4" square.

The biggest challenge will be not to lose it!
Then another that was a refreshingly large 2" square medallion quilt.
Yesterday I made a hexie quilt, but at 2.5" square it's almost too big for the gallery, cute though it is!

I plan to try and find some smaller hexie papers (or make some) to see if I can make one that is a little smaller.

Can you tell that I'm having fun?  

If you have a few spare minutes and some fabric scraps I can heartily recommend it!
 

Wednesday, 19 May 2021

Completed Avery Garland Cushion

Remember that I was working on this?  Work continued, and here is the completed cushion cover.

I finished the hand applique, backed, basted and quilted it, then finished it with an envelope backing.

I followed the lines on the background fabric to cross hatch the middle of the garland.  I quite like the look, but not enough to continue it on the outside of the ring, where there would have been an awful lot of stopping and starting!

The back of the cushion cover was made with my scant remains of the background fabric, with some almost matching blue in the middle.  

Show in it's un-ironed state here, I was quite pleased the overall use of fabric, given what I had left of the diamond pattern one.

 And here it is, in it's full glory.  A 25" square cushion!
 

Fun to make, and I daresay it will be used in the garden over the summer.

Jo Avery made an easy to follow project that was fun to do.

On to my next project now - I've decided to make some simple star blocks with some of my scraps.

Wednesday, 12 May 2021

Another Quilt Finished!

I completed this 'square in a square' quilt that I started a couple of weeks ago.

Blocks were joined into strips, strips were joined into a quilt top, a backing was made, wadding cut to size, basting happened.....it take a lot to get from some patchwork blocks into something that is layered and ready to quilt, doesn't it?

Then it was quilted with a loose stipple, bound in the last of the bright pink zig zag, and finished!

You can see here the paisley that I chose for the backing, and plain pale pink that I used in an inserted strip to bring it up to the right size.

It's bright and fun, and I hope that someone enjoys it!  

I suspect that it might find a place in my quilt heap for the moment (it's quite chilly when you are trying to enjoy a cuppa with friends outside this month) although ultimately it will be given away.
 

Finished it was 54" square - perfect for a lap quilt!

Wednesday, 5 May 2021

From Scraps to Products!

You know what it's like.  You put scraps to one side until you have time to deal with them, then end up with the drawers not closing before you know it!

It was time to address them again!

It leaves me feeling quite smug once they are coming into order by being cut to standard sizes, ready to use when I next fancy a scrappy project.

I cut into 10" squares, 5" squares, 3.5" squares, 1.5" squares and 2.5" strips.  Anything that doesn't match those (or where a cut would seem too wasteful) gets put into a colour themed bag.

This time I added another couple of measurements to cut to, and cut some pieces to make into re-usable tissue holders.
By cutting at 5.5" x 7.5" (inner and opening 'flash') and 5.5" x 6.5" (outer), then pairing and sewing them together, I ended up with this sort of thing.  A quick press, the two end seams sewn, and then the cover is ready to be turned through and filled.
Before I knew it I'd made 40!

What a delightful tumble of them!

And here they are in their serried ranks (missing one to a family member already!).  I daresay that they will raise a few pounds for a charity.


Fun to make something a little different.
 

Wednesday, 28 April 2021

Another small piece in progress

I'm flip flopping between projects at the moment.

I'm making another cushion cover, this time with some paper piecing.

It's a pattern by Jo Avery called the Avery Garland.

You can see her lovely work here.

Of course, in her quilt she repeats the make 9 times, but I'm only creating it once to make my cushion cover.

I've chosen to make mine in some of my favourite batiks

The paper piecing complete, it's time to add the applique.

Here are the parts ready to add

And here is the first stem.  A bit more work to do before it's ready to be quilted, but now I feel that I'm well on the road with it.  Time to check whether I have a spare cushion pad that is the right size!
 

Wednesday, 21 April 2021

I should have started with a plan.....

I wanted to make a quilt with a simple pattern and decided to use up some of my pink and blue/white stash, where I knew that I only had limited amounts of them.  Of course, the 'limited' bit already tells it's own story.

I planned to make 6" finished squares, knew that I could get two from a width of fabric x 2.5", so I cut 4 strips from six fabrics and mixed them up a bit.

For some reason I thought that this would give me almost 100 squares, rather than approximately half that number.  Oops!

Never mind, I thought.  I'll just make the same again.  No, not possible, as I had only limited amount of these fabrics......

I decided that I could add in one more fabric, and make some solid rather than 'square in a square' blocks, and reduce the size to nine blocks square instead of ten blocks square.

A little time with my cross stitch program (it's a really easy way to see where to put blocks, if you are working the wrong way round, like I was, and making a design to use a specific number of blocks, not making the number of blocks for a design, which is more usual!).


Then I laid them out on the floor, paired them up ready to sew, and started chain peicing them.

It won't be long until I have a quilt top ready to iron, back / baste and quilt!

In the mean time I shall cut a binding from whatever I have enough of, and put everything else into my scrap drawers.  It's soon going to be time to address those drawers again, as they are getting to be hard to close.

Hope that you have a fun project to enjoy this week too!
 

Thursday, 15 April 2021

Double Disappearing 9-Patch

I wanted to try a mini version of a block to see if I liked it enough to make a whole quilt from it.

I started with a nine patch made from 2" squares.

I sewed them together.

I didn't iron the block, which I might do at this stage another time.

Then I made six cuts.  Two across the centre,  splitting that centre square into four quarters.

Then four cuts, cutting diagonally across each mini square that was made.


Then the parts are rearranged to make two smaller blocks, with two of the centre quarters 'kissing' in the middle.

I do realise that the photos would have been better if the block had been ironed!

Then the two mini blocks were sewn together, and I joined the two together so that I could see the lattice effect.

My nine 2" squares gave me two blocks that are 2 7/8" square.

I'm told that if you start off with nine 5" squares then you get two blocks that are 8 1/2" square, which seems to be a good useful size for making a quilt.
 

Tuesday, 6 April 2021

Quilt finish!

A month ago I made a quilt top.  This week I finally completed it as a quilt!

The Starburst pattern by Missouri Star Quilt Company was quick and fun to make.  I made it in just two colours, but it would be easy to make a scrappy version (or a curated version!) too.

Pictures taken in afternoon sunshine, after a day which started with snow flurries.  Difficult to predict what weather you will get in April!

I quilted the interior 36 blocks with a loose meander, and the outer ring of blocks with a simple feather.  It's so long since I'd tried any sort of feather that I thought that I could do with the practice!
Not shown here, but it was a pieced back - just three fabric strips - the one shown here and a polka dot with a similar blue.

Finishing at about 50" square it's a good lap quilt size, and will probably go to Project Linus.

Now to decide on my next project!
 

Wednesday, 31 March 2021

Matching!

Remember that polka dot fabric that I used for the garden projects in last week's post?

There is quite a lot left!  But to start me off on how to use it, I've made a small tray mat.

The tray is grey to match the garden furniture - a Poundland bargain!

Hoping to have more time for sewing over the next week or two.....
 

Thursday, 25 March 2021

Garden Sewing

Fabric isn't just for indoors, is it?  

I'm experimenting with fabric 'jackets' for these less than lovely (but very useful!) black plastic plant pots that home our bamboos.

They give us a lovely pop of colour on the decking!

The are are some members of the family who think that using the left over fabric to make a compost bin cover may be taking things a step too far.... we will make a decision in the next few weeks as to whether it stays or goes!

Loving my cattle trough pond and solar fountain, though!  Lots of fun.


 Despite lots of time spent on the garden, there was still time to bake and enjoy this!

Another adult in the household!  Crikey!

Happy birthday, Georgie!

Wednesday, 17 March 2021

Cushion Cover Complete

Limited sewing time this week, but just enough to make this cushion cover using the mini starburst that I showed last week.

A grid to cover it, and freehand feather style quilting in the corners.

 The colours are more accurate in the lower photo.  It's made a lovely spring coloured cushion!


Tuesday, 9 March 2021

Mini Starburst

Just time for a mini make!

I enjoyed the starburst quilt from last week, but wondered if I could try some more untrimmed Half Square Triangles in a small size to see how accurate they really were.

This was the resulting mini top  - finishing at just 8" square, rather than the 62" of the original.

I chose my fabric (the pale one is a solid pale green, it didn't photograph well!).  I wanted spring colours (think new growth and crocus flowers) but without heading down the yellow and green route!

Then I cut 16 x 2.5" squares of each fabric, and set to, making it exactly the same way as the larger one.

I have to be honest, I didn't know exactly what size it would come out at.

I think that it might become a panel on a file cover or perhaps part of a bag.  

Fun, but not really a practical size to use, or small enough for an interesting display piece.  Still, it's good to be able to sew simple stuff without necessarily having an end goal, isn't it? 

Wednesday, 3 March 2021

Starburst!

I've had fun making a simple quilt top this week.

To make a two colour quilt top, you could do this too.  

Take16 squares of a print and 16 squares of something contrasting (my squares were 10" square).

Place a pair of contrasting fabrics together and sew around all four edges of the square.  

Cut into four with two diagonal cuts.

Open out to show the 4 half square triangles, press and trim the 'dog ears' off.

Reapeat with all the squares that you have.

Put together 16 HSTs in this pattern - this makes a quarter of the quilt.

Sew them together.

Repeat three more times

Put together all four quarters - make sure that you pay attention to get the 'starburst' pattern.

Sew together and admire your quilt top!

I really like this colour combination, but every time I see it I'm reminded of my granny's 90th birthday, when one of my cousins bought her a t-shirt in these colours.  Funny how colour can bring back memories, just like smell can - that the birthday party was 45 years ago!

You could always make an alternative layout - but I don't think that this is as pleasing.

I haven't got any further than this - helping DH with a garden project has taken over for the moment, - but I really enjoyed this fun and fast quilt top that finishes like this, without borders, at 52" square.  You could easily add a border to bring the size up a little if you wanted to.

If you'd like to see a video of this pattern being made, hop over to Missouri Star Quilting Company to see it here.