Wednesday, 23 February 2022

Christmas Crown Tutorial

A rack of hats? A millinery of hats? A fascination of hats?  Choose your own collective noun! 

What I actually have is a dozen hats ready for Christmas, as we're moving away from Christmas crackers.

Time to write an outline tutorial, in case I find that I need to make some more!

The basic pattern is based on a sheet of A4.  To make your own, cut a 5" strip of the longest length of your A4 paper.

Fold a 1/4"  for a tab overlap at one end, and then fold the rest into quarters.  Mark 4 points for the top, and draw a line at 2/5" up the strip, and join the top points up with the line with 45 degree lines to make the crown shape.

You will use the pattern piece twice, ending up with a shape that is roughly 23.25" long and 5" tall, with 8 points and a tab at either end.

I drew round the template onto interfacing and interlocked the patterns (with a slight offset at each end so that the points interlocked).  I made six pairs.  It's economical for your interfacing and fabric to do this.

Next I ironed the interfacing onto  the wrong side of one of my fabrics, keeping the pair together.

Then, layer up with the second fabric, right sides together.

Sewing next!  Sew 1/4" in from the drawn lines, sew around the two hats, leaving a generous opening to turn through open along the plain edge of the crown.

When sewing around the 'tabs' I made one closed and one open.  Once the crown is turned through you can then turn  under the edge of the open one and slot the closed one into it.  It makes it quite easy!

Once the sewing is finished, cut the hats apart down the drawn lines.

Then trim off the points and clip the valleys, being careful not to snip through the stitching.

Settle down for a few minutes of hat wrangling, turning through to show the right sides of both fabrics, and poking out the points as well as you can.

Once it's turned through, it's time to slot those tabs together and make the flat shape into a round crown.

I might also iron the creases to make sure the seam over the turning gap stays neat.
Time to top stitch now!  

I start by making a row of stitches down the tab, to join the crown ends together.  Then top stitch around all the points, stitch again down the tab, and then along the bottom of the crown, which will sew the turning gap closed.
Done!  Repeat until you have sufficient for your needs.

I did also make one with a ribbon tie (sewn in at both 'tabs') so it could be a variable size, but after trying the sewn version on a variety of head sizes, I decided that I didn't need to do that.

I was going to decorate them with sequins and beads, but decided that I'd rather be able to wash and iron them easily!
 

Wednesday, 16 February 2022

Nine Patch Fun!

A surprisingly fast finish on this!
My usual Bernina sewing machine had to go in for a service (she was a bit grumpy about missing her service last year!), so I was going to be using my second machine - which is lovely to have, but much noisier and full of vibration than my lovely Bernina, and without great things like the 'needle down' button!

I wanted to carry on sewing, but with a project that wasn't too demanding of accuracy, whilst I got used to the machine again.

So, lots of chain piecing, as you can see.  Lots of short sashing pieces here, swiftly followed by the longer  sashing pieces.


Then it was time for borders, backing and basting.
Back to the machine for quilting,  and I'm pleased to say that the Bernina was home in time for putting on the binding.


I'm not sure that the backing is entirely right for the tones in the front of the quilt, but it had the absolute qualities of there being enough of it (thank you Benta!) and it being right beside me in my craft room!

So, 'Up the Garden Path' is finished.  At 58" square its a decent size to keep on the sofa for warming feet or more when the weather isn't quite as warm as you want it to be coming in to spring!

I hope to gift it to an old friend in the not too distant future.
 

Wednesday, 9 February 2022

Another Vintage Tile Complete!

Completed!  My second version of Vintage Tiles (pattern by Lou Orth).  This is the one with the blue 'echo'.
This time the quilted motifs in the centre of the blocks were trying to be waves - a bit like the classic Japanese wave print, but not so accomplished!

This is the one in the centre.

Simpler ones in the remaining 8 stars.


Bound with the plain blue from the echo.

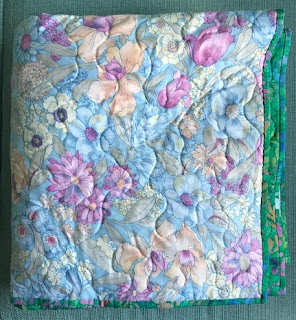
Backed with two floral prints.

Now to be hidden away until I decide it's the time to reveal the quilts to their intended recipients!


Wednesday, 2 February 2022

Small things.

I've been building a stack of 'leaders and enders' nine-patch blocks.  Each is 3.5" square when unfinished like this, so will end up at 3" square within a piece.

I've just counted them, and I have 48 in total.  One more and I'll be able to make a square quilt with them!

I've decided to use some plain green fabric to float them in.  Here I am cutting all the setting triangles - they are a generous 5" square, then cut in half.

Making them from yardage rather than scraps makes it a quick job!

The actual sewing will take longer and will probably slotted around other projects.  Excellent mindless sewing!

I've also been experimenting with a template for masks that are shaped, rather than my usual design which is based on a rectangle.

These are for DD2. DD1 is happy to stick with the rectangular ones.

Always plenty of projects to be getting on with - I've also made (but not photographed) a heap of mini Christmas trees, ready for a workshop in November.  Nothing like being prepared!
 

Wednesday, 26 January 2022

Complete!

First of the pair complete!

60" square.

So, a lap quilt or sofa throw, not a full sized bad quilt.

I bound it in the same pale green fabric that I'd used in the quilt.  It goes well with the backing fabrics too, so I'm very pleased.
I even managed to get the binding in the right places for the half square triangles.

I'm pleased with this finish, and hope that the intended recipient likes it too.  It will be later in the year that we actually hand it over, so for now, it can be washed and stored away.
 

Wednesday, 19 January 2022

Quilted!

I'm not great at taking photos of my quilting - but here are my best attempts!

Eight of the star centres have my best attempts at a sunshine motif.  I know, not perfect,, but stitched with love!

The centre tile is stitched with the recipients name, and is outlined in sunshine shapes again - three different lines echoing outwards.  Difficult to tell on the photo I know, but you can see the smallest one on the dark star points.

 If you look, you might be able to see them here on the back of the quilt, but with the pale aqua thread it doesn't really show up that much.

Outside of that I quilted a meander. I think that it's going to be soft and cosy.

Next week I'll be able to show you the finished article!

Wednesday, 12 January 2022

A Busy Week!

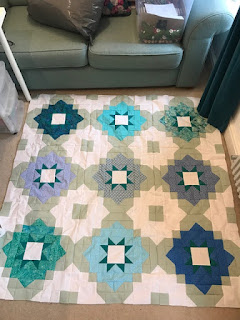
I finished the final three stars for this quilt top and sewed it together.

Now this blue 'echo' version gets put to one side, so that I can concentrate on the green 'echo' shown below.

(Look closely and you can see that they are different, really they are!  This one uses Kona 'Breeze', and the one below uses Kona 'Sea Foam').

I'm happy to say that this version is now basted (you can see the masking tape holding the backing onto my living room floor).

At 60" square it means moving some of the furniture, but I'm pleased that it is now ready for quilting, once DD2 has finished revising for exams this week.  Although it's slightly on the larger side of what I truly enjoy quilting, I've been having fun deciding how to quilt it for the recipient.

It's going to be a busy week!
 

Wednesday, 5 January 2022

Welcome 2022!

I should really have blogged about this earlier.

The very lovely Benta (who blogs HERE) made and gave me this lovely kit for Christmas - and permission to open it early!

It made the most charming little julenisse.
Who, once made, was put to work under our tree, guarding all the fabric wrapped presents!  He is now relaxing with his friends on our hearth and is looking forward to being 'off duty' completely from the 6th Jan when we will put away our decorations - ready for next year!
When I wasn't being involved in Christmas and New Year and all that went with it, I was working away at these star blocks with the blue 'echo'.  

 Just another three to make until I can complete the second quilt top.

Of course, if I had actually ordered the wadding I wanted, rather than just thinking about it, I might be further along with double project.  As it is, I'm sure that I have plenty of time to finish the stars and join them, and make two backings large enough for them, before the wadding arrives which will allow me to sandwich them!

A good start to the New Year, though, with a little stitching every day.

Wednesday, 29 December 2021

Happy New Year!


 Happy New Year!

I'm pleased to say that I finished the year with a completed quilt 'flimsy'!  The first of the star quilts is put together.

Not a great photo - but it was enough to show me that I'd made an error - oops!  Can you see that the left hand side of the right hand middle star is wrong?  I made a mistake and didn't pick it up when I made the single star, only when it was sewn into the top.

Don't worry, I've fixed the problem now.

Just waiting for the wadding and thinking about what fabric(s) to use for the backing.

In the meantime, enjoy the remains of the festivities, and if you feel the need to make resolutions, remember to include something lovely and crafty or arty in there.  Good for you, good for your mental health.  Take care in 2022 everyone!

Wednesday, 22 December 2021

Happy Christmas!

In this season of giving I had a bonus - a surprise visit from a friend who has settled in Australia.  Perfect, as I was able to pass over this somewhat delayed wedding gift to her and her husband!

A year after I finished it (see or read about it here) it is with the people that it was sewn for.

It makes me very happy!
Alongside that I've made a couple more stars.  

They will look familiar, but the 'echo' fabric is different for this quilt top, breeze blue rather than  sea foam green.

The background, print and inner star points are all the same as the last quilt top, though.
More things that make me happy, sewing anything for friends and family!

Hope that you are going to have the happiest Christmas that you can in the circumstances that you find yourself.

Festive wishes to one and all!
 

Wednesday, 15 December 2021

Tiny Ornament Sew Along

Kitty Wilkins, aka The Night Quilter, has been hosting a tiny ornaments sew along for the last couple of weeks.  I've been slightly dull and made 9 of the same pattern (so far!) - but I really love this stupidly small Christmas tree!
So there was a bit of this going on - trimming blocks and cutting ribbons for them, before sewing around them ready for stuffing and finishing.
But one of the best things about them? All the trees and the immediate backgrounds for them came from the scraps from some of these star blocks!

Isn't that great?  

I've kept the rest of the triangles from the 'covered corner' method that was used in this pattern to use in more tiny stitching silliness - although they wouldn't usually meet my standards for keeping, as I can't cut a 1.5" square out of them....lucky these tiny ornaments can rescue them!


 These are the final two stars of the nine to make the first quilt.  Still not laid out and sewn together!  Still, progress, even if slow, is progress.

Wednesday, 8 December 2021

More Stars

Four more Vintage Tile blocks made this week!

When I lay them out together like this, you can see how the secondary stars appear in the background.

Isn't it lovely?

The finished size that I am going to make is 9 blocks.

Onwards and upwards - I still need to make another 2 stars to make my total for this first of two quilts that I've planned.
 

Wednesday, 1 December 2021

Seeing Stars

I see a lot of these in my near future!  I'm making two almost matching quilts (one for my eldest and one for her best friend).  Same pattern for each - Vintage Tiles by Lou Orth - but a different 'shadow' colour on each quilt, so that they are different but similar.

I need to make nine stars for each quilt (60" square finished).


I have cut out all the pieces and make block 'kits' for all of them.

I think that on a 'good' day I can probably make two blocks a day - but it does rather depend on what else is going on.  So far I've had a day when I made one, a day when I made two and a day when I made none!  It's not really going to plan!


I've decided that I'd better not try and stick to my original idea - of a quilt top being finished in a week - as it seems like that might be unrealistic, with the rest of real life needing to happen too!

So you might be seeing more of these appearing in my blog over some weeks yet!


S

Wednesday, 24 November 2021

This and That

I have been sewing, but not so much on my own projects!  Its the pre-Christmas time of year when I tend to help my girls with the sewing for their mini businesses:  if you want fabric gift bags and wrapping look HERE for Georgie's shop, and if you want fabric cleansing pads then look HERE for Frankie's business.
As well as topping up the stocks of actual products, I've spent a little time making this bunting style banner for the stall that Georgie is going to have at the Orleans House Gallery Christmas Shopping Weekend (it doesn't trip of the tongue, does it?!?).  If you are local to Twickenham and want to pop and see her (or me), she has a stall on Saturday 4th December.  Entry to the show is free, and it looks like there will be lots of lovely things to buy!
 

Wednesday, 17 November 2021

Improv Complete

Finished!  Fully quilted and bound (although I confess, no actual label yet).

I'm pleased with how it's turned out.

The large scale blocks from the workshop (thank you again, Brenda Gael Smith!) I quilted with diagonal lines.  The jury is still out on whether I should halve the space between them to give a denser fill, but I like the handle of the quilt how it is, so I think that I will go with feel over the look of it....
You can just see at the edges here that the border blocks were quilted with a loose meander.
Floral backing from my stash.  Not perfect, but the right size (well, with a 10" blue insert strip that I forgot to take a photo of!) and at least the blues in it work from the front to the back.

The binding was the same printed fabric that I used for the insert strips on the front to make everything fit.

This is how it looks now that it's complete.  It was great for using my home cut 5" and 10" pieces from my scrap drawer!  I even managed to get enough contrast in most of the border blocks without cutting any extra or pushing the colour paletter from the centre blocks too far!
And what decided me on this block layout in the end?  

It was this coverlet!  Made by an unknown maker, but associated with the marriage of John and Elizabeth Chapman.  This part of it was made in England in about 1829 (with printed borders not shown here added some decades later).  It was displayed at the V&A museum at their quilt exhibition several years ago. Much more detail about it here on their web site.  Makes me laugh that the story of it says that the papers used in the 'jockey cap' blocks were supposed (by tales in family history) to be the couple's love letters, but when looked at, they were random ledger sheets, adverts or anything else that came to hand! Far more prosaic, but it really doesn't detract from the quilt, does it?

Off to pull some fabrics for another quilt now. Maybe I should add a secret to it, or just start rumours about it.  The chances for fun are endless, aren't they?!