Wednesday, 23 November 2022

Cherille's Scraptastic!

Not too long ago, I'd asked another member of Richmond and Kew Quilters for an old pair of jeans, ready for cutting up for a pin cushion workshop that I'm planning to run for the group next year.

Cherille is VERY kind - and gave me not only the requested denim, but also lots of other fabrics that might be suitable, and even a book about making pincushions!  Super generous, as so many people in the quilting world seem to be.  Perhaps the art of stitching makes us all nicer people?

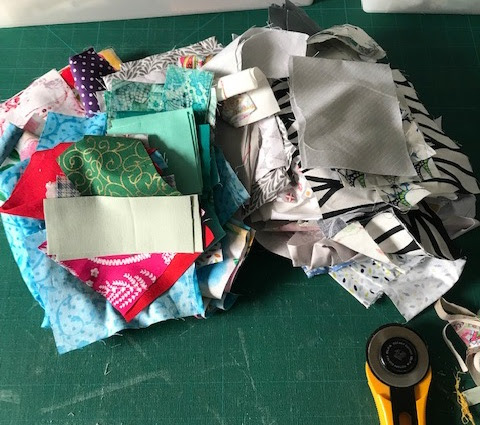
Anyway, after I'd cut appropriate shapes and amounts of fabric, I still had a lot left.  I decided that even though they were different styles and shapes of fabrics, it would be fun to make a scrap quilt with them.

This is it!  I added just a few small squares from my own scrap drawers in order to make the shape that I wanted.  Isn't it fun?  

I shall let Cherille decide whether she wants to keep it or gift it, and hope to pass it over to her at our next meeting.

Thanks Cherille!
 

Wednesday, 16 November 2022

Autumn Colours

I decided that the Christmas coloured wreath I showed a fortnight ago was a bit premature!  I wanted something that would work as an ornament right now (impatient!) so make this one in autumn colours.  In the centre is a group of three mini bells.  

I'm pleased that I have a little seasonal decoration to hang!
 

Wednesday, 9 November 2022

Ocean Deep

My Quilt Group (Richmond and Kew Quilters - come on and see us if you are local!) hold regular challenges.  This month it's 'ocean or seaside inspired A3'.  Now, I might just be drummed out, as this is slightly larger than A3, but it's my attempt at a dolphin, using a cross stitch pattern to give me the 'pixel picture'.

Fun to do - I have a box of 1.5" squares just ready to go for this type of project.

The quilting shows up better on the back that the front.  I was going for sea whorls around the smoother dolphin shape.
 

Wednesday, 2 November 2022

Too Soon?

Too soon to be playing with an idea that I picked up from Pintrest (thank you, Pintrest!)?  Fun wreath shape with EPP and a little ribbon and a bell.  A simple project that I think looks good.  Perfect simple stitching.
Aside from that I've been helping Georgie with her Christmas stock.  She made most of it last January / February, but just wanted a few brighter fabrics included, so we went shopping, and then got cutting and sewing.

FabWraps is just about to hit it's pre-Christmas stride!  I should get these new fabrics added to the Etsy shop!


 One of the fabrics she bought is this one - which makes me laugh!  It's got everything - unicorns in santa hats, candy canes, snowflakes, rainbows......  I think that I need to go back to FabricLand and buy some more for my own Christmas wrapping.  


Hope that you are also finding things to laugh about amidst the chaos. 


Wednesday, 26 October 2022

Jewel Finish

Finished!  I'm really pleased with this little (54" square) quilt!

It's very simple - starting with a bunch of 3.5" squares and some sashing - but shows off the fabrics beautifully, which is what I wanted. 

They are a mix of some from my own scrap drawer, but a lot from a quilting friend, Cherille.  They work beautifully together.  Thanks, Cherille!

.This is the back.  All quite simple.
And the quilting was also simple, just enough with a variagated thread to hold everything in place, without taking anything away from the fabrics.

It all works well together!
 

Wednesday, 19 October 2022

Improv Dandelion Clocks

On Saturday I enjoyed an online workshop with Jo Avery - making an improv dandelion clock.

Good fun!

This is my set of four blocks joined together, finishing at 24" square.

It will probably become a medallion centre to a scrappy quilt, but I'm not sure yet.

Of course, that felt a little on the large size, so I made some smaller blocks too, backed with some more joined together fabrics, which are shown here so you can see how I quilted the little mini that I made.
Finishing at 9" square, this is my mini, all ready to go up onto the wall to remind me of a fun day and a useful improve technique.

It was organised by the miniature group which is part of the quilters guild.  Thanks gals!


Wednesday, 12 October 2022

Distracted!

I was working away on my quilt - but when I trimmed the edges after quilting, I had a nice long strip that seemed perfect to make 'Herb' - pattern from RicRac - so I got distracted!
Then, as I was finishing it, my DD2 spotted it and fell in love - so I ended up making a second one, having thought that my great niece might like one, which is why I'd got the pattern in the first place!

Fun distractions, quite fast to make, even though I can see that I still have some skill gaps in how to make the perfect soft toy! (all down to me, not the pattern, which is great!).
 

Wednesday, 5 October 2022

It's Happening!


 I've made a start!  Here is the jewel box quilt (just 3" blocks sashed and on point) stuck to my living room floor, having just been basted.

Quilting, trimming and binding will follow.  It feels nice to be making a quilt!

Wednesday, 28 September 2022

Tutorial - A5 pouch

Need to make a simple pouch like this for A5 papers (or A4 folded in half)? Here's how!
Start with:
      1 x 7.5” x 21” fabric (outer – avoid directional prints)     
 1 x 7.5” x 21” fabric (lining)  or you could use just 1 x 7.5” x Width of Fabric (inside and  outside will be the same).
   1 x button or snap fastening.

How to make.
  Cut your fabric, and lay right sides together.
  At one of the short ends,  measure 1” each way from one corner, mark a diagonal line between them, and cut off the resulting triangle through both pieces of fabric.  Repeat for the other corner at that short end.  This will form the shape for the flap.
 Pin if desired and start sewing the two pieces together using a ¼” seam allowance, starting about half way down one of the long sides. Sew almost all the way round, but be careful to leave a gap of about 3” to turn the pouch through.

Clip the excess fabric from the corners and turn through.
  Press neatly.
 Top stitch along the straight short edge, 1/16” from the edge.
 Fold the straight short edge up 8” to create the pouch and pin. (if you are confident with the positioning you can add a button or snap to the straight edge before you do this).
  Starting at what will now be the bottom of the pouch, top stitch, 1/16” from the edge in one continuous line from the bottom of the pouch, right up and around the flap and down the other side to the bottom of the pouch of the opposite side.  You may wish to ‘forwards and backwards’ to reinforce the start and end of the stitching, and perhaps at the top edge of the pouch too.  This top stitching not only forms the pouch sides, but also seals the gap where you turned through the pouch.
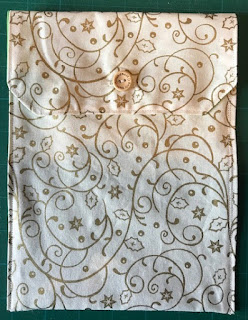
 OPTIONAL: Measure a line 3” up from the edge of the flap and sew across this line.  It will help the flap to hang neatly but isn’t definitely required.
  Make the correct size button hole at the appropriate place on the flap, then sew the button to the pouch OR add the second part of the snap. (Just for information, when I make these I put one button in the middle, 1” to 1 ¼” from the top edge of the pouch, and the button hole 1” up from the lower edge of the flap).
Admire your lovely pouch!


Wednesday, 21 September 2022

Starting a new quilt

A quilting friend gave me some of her scraps. Lucky me!  I've cut them into the sizes that I commonly use, and have decided to use some of my 3.5" squares to make a simple quilt.
Sashing them with black is an unusual choice for me - I love the look but find it difficult to sew on sometimes.

Inside the quilt the sewing is all with white thread - easy to see and unpick if necessary!

After sashing was added on one side, I'd add a long strip / sashing to the top of the pieced, then it was ready to add to the quilt top.

It is based on an idea I saw on Pintrest, but I don't often make quilts with the blocks on point, so it's making me have to think about it!

Here is what I have so far, laid out on my 'design bed'!

Still more to do!
 

Friday, 16 September 2022

It's been a while.....!

I can't believe that it's two months since I last blogged!  

Not a lot of sewing since then - it's been the summer holidays, and I've also moved from my previous sewing space to a smaller one, which took quite a lot of energy!

The sewing things are all in the right place now (more or less) but my books and items relating to other crafts are in a different space and still need to be sorted out properly.  This will happen over the next few weeks.

So, what sewing have I done?  Well, there was this 12" block, which will be added to others made by my quilting group to make a group quilt.  This one was with a disappearing technique. and started with two 10" squares, but needed a border to bring it up to the right size.

I've also refashioned an item of denim clothing for another quilt group challenge.  This was a skirt, and you can see that I haven't done that much to it to re-fashion it as a beach bag that DD2 is looking forward to using next summer.

Finally, I put together blocks that a fair number of us had made from my quilting group, then finished the quilt and entered it in the Kew Horticultural Show.  We were pleased to win Third Prize!

It's a cute baby quilt that will make a lovely donation.

Not oodles to show for the summer, but lots of lovely memories with my family, which are more valuable than anything else!
 

Wednesday, 13 July 2022

Stars in my eyes

I'm a member of the UK Quilters Guild, and, in particular, the Miniature Quilt Group.

They have asked for miniature quilts up to 8" square for a display.

Unfortunately, when I made this, I managed to make it just a little oversized - doh!

I may still send it along, but I'm not sure.


 Whether I do or not, though, I had a lot of fun making it and thinking about how to quilt it, and then doing the actual quilting.

Isn't that the joy of the creative life? Enjoying every step of the project from start to finish!

I've even managed to work on a few larger than this projects - photos to share soon!

Wednesday, 15 June 2022

Sewn Presents


 Not much to show still - but when a friend invites you to a retirement party it seems a shame not to sew a few bits and bobs in her favourite colour!

Squishy basket, tissue cover and zippy pouch - the old favourites are favourites for a reason!

Hope that you are managing a bit more crafting or sewing than I am at the moment.  It's just taking me longer than I thought to get back to full sewing strength!


Wednesday, 25 May 2022

The Missing Month


 These might not be a great deal to show for my 'missing month' - but my DH shared Covid with me - and stitching has hardly happened.

Like so many others, I felt poorly, then tested positive, then (eventually!) tested negative, and then..... I've still felt even more worn out than usual.

So, I watched a few short stitching videos, made a couple of tissue holders (yes, these ones with the hand stitching on), and have managed nothing else.

I'm hoping that I'll pick up even more soon, though, so I hope to be back with regular stitching updates in the not too distant future!

Hope that you are all staying safe and well!

Wednesday, 27 April 2022

Another Start

I've started another quilt top!

This time I'm making another MSQC one - their Wallah! or Voila! pattern.

It started off with me needing to cut a lot of 5" blocks.  I cut 96 background and 96 mixed others - the background from yardage, the others from smaller pieces of fabric, although I guess that you could make it with just two colours if you wanted to.


These were my piles.


There are two 'sets' of four patch blocks that you need to construct.  One has three 'background' squares, the other has just a single 'background' square.


When they are made, you need to cut across the odd one out in each set, from corner to corner.  Then make a 2" strip with your next cut.

After that, swap these strips around.  I found it easiest to make these in pairs.... then I knew where I was!
You can see how little triangles start to peep out in this 'magic' technique.
When you sew them together, you end up with a block with a stepped edge.  Don't panic  
Then you need to trim it to 8.5" square, as shown here.
When you have four of each type (I called them darks and lights in my head - but you don't need to call them anything, just count them!)  You can lay them out into 'big blocks'.  

You can see the light star in the darks block and the darks star in the lights block.

I won't sew them together until I've made them all - that way I hope that I can get rid of too many places where the same fabrics in my mixed part end up next to each other!
Plenty more cutting and sewing to do before I have a quilt top to show you.  I shall work my way steadily  through my pile until I'm done!
 

Wednesday, 20 April 2022

Homework!

I came away from my quilting group meeting (I'm a member of Richmond and Kew Quilters - if you are local come on down and join us!) with several bits of 'homework'!

First there was this fabric postcard to finish - it felt like cheating, as I actually did nothing but machine stitching on it.

Then, the lovely Benta had stitched all the committee members and hangers on (like me!) fancy felt 'starter' patches.  I wanted to make mine a little sturdier, so mounted it on a couple of extra layers and added a brooch back to make it easier to wear at meetings.  It will help make me more visible to other members so that they can approach me if they have a question or suggestion.
Lastly, another Benta initiative, was to make some covered corner blocks with teal squares that Benta provided to us.

Next month we will gather the squares in and turn them into a quilt top ready for donation.

So, all my 'homework' is done for the month, and I'm ready for our May meeting!
 

Wednesday, 13 April 2022

Improv. Nine Patch

A few weeks ago I took a Zoom workshop with Brenda Gael Smith, on improv. crosses called 'The X factor'.  You might remember the tiny 4" quilt that I made at the time.

This is my full size quilt with my resulting blocks.

Although I have one 'x' in the very centre, most of my blocks are actually nine patch crosses, which were more economical with the fabric.  Several different techniques used.

I was using fabrics from my stash.  As I ran out of the paler background fabrics, I decided to stick with  the number that I'd made and add improv strips to two sides to make it roughly square - almost 60".
On the back I used some pale blue chambray, made to the right size with a floral strip.  I was pleased that this worked, as this gives it a link to another quilt that I made earlier in the year when the floral was used as the backing.  I wanted this, as it is destined for another friend - the third leg of a trio that dates back to when I was eight, and moved house and school.
I think that it's worked out OK.  I just hope that my friend likes it too!  It's quite a random gift to arrive out of nowhere, I realise!
This is the only 'flat' shot that I have of it (from when I was about to baste it).  You can see that I was aiming for a darker cross shape within the block layout, then with filled in darker corners too.

I'm just about to take it off to the Post Office.  Safe journey, latest quilt!
 

Wednesday, 6 April 2022

Scrap Cutting and Fab Hab

My scrap drawers were starting to groan with the number of scraps that I'd been adding to them.

You know how it is, sometimes when you finish a project you just want to get on with the next one, instead of sorting out the scraps properly!

It's time to sort them out!

I'm cutting to my usual 'recipe'.  10" squares from the  scraps that are large enough for them, then 5" squares, 3.5" squares, 2.5" strips, 1.5" squares, 1.25" strips.  Anything else that appears (for example 2" strips, for some reason!) is put into a colour coded bag of scraps.  

It all packs into the drawers a little better, but reminds me that I need to start planning some more scrap projects!

And my 'fab hab'?  This darling little mini cupboard (it said on the box that it was a tea box) that DD1 gave me for mothers day.  Perfect for storing / displaying my coloured threads - the neutrals will stay in the cupboard!

Not the vintage haberdashery display counters and drawers that I lust after on the auction sites, but a mini nod to them!