Wednesday, 25 October 2023

Yet more bobbin blocks


 My next four blocks completed - Fire (difficult to see the flames sewn in orange cotton, but they are there!), Water, Air and Stone.

I'm pleased with my 'stacked stones'.  Makes me want to head to the beach and stack some in real life!

I've now finished 20 of the required 35.  It's very tempting to start putting them together in their long strip, but I think that it would probably be better to wait until I can do all the blocks at once, or I won't get the settings exactly the same (I'm intending to use a zig sag to join them, and my machine is adjusted manually, no digital accuracy for me!).

Wednesday, 18 October 2023

Interleave Mini Quilt

I am a happy member of the Quilters Guild UK Miniatures Group.  They have fab organisers, who keep us well supplied with online workshops and challenges.

As part of their offering, I had the pleasure of an online workshop with Sue Battley last week, who taught us how to go about making interleave quilts.

This was, of course, a mini one - making something perfect for a mug rug, with strips cut at 3/4" and finished at 1/4" - so cute!

I used a piece of fabric over my wadding, that I'd marked with 1/4" lines on, just to give myself a fighting chance of the stitched lines coming out parallel to each other.  Sue taught me the value of a central 'spine' line to arrange the strips on.

After marking the central lines on the back of the triangle blocks too, it was time to cut them into the 3/4" strips, and lay them out with gaps between them.  The blocks started off at roughly 8" wide and 10" high.

I laid them out on a large ruler so I could move them around when I needed to, without disturbing the layout.

Then the second triangle block was cut and interleaved between the first set of strips on the layout ruler.
After that the fun began!  Quilt as you go, but in small scale.  

You can see that I didn't always get my centre lines quite right.  I struggled to see my markings on some of them - I need to find my chalk marker if I do this again with dark colours!

So, not perfect (and, not quite finished, it still needs to be bound), but as a demonstration piece, very effective.

Thanks Sue!  Lots to think about there, and perhaps time to experiment with some larger shapes and different colour layouts too!

The finished piece is roughly 6" tall by 7" wide, once trimmed.  All those seams eat fabric!!
 

Wednesday, 11 October 2023

More Bobbin Blocks

My next four blocks on my bobbin project.  These represent coffee, wine, time and jade.

I love working on these little 4" blocks, even if sometimes I'd be better off having the idea and doing the sewing before trimming and finishing the block (like the jade one, where I made the block and then 'quilted' it, which has pulled it out of shape.....)


Never mind, I'm still having fun, playing with these!
 

Wednesday, 4 October 2023

Jacks Chain

Jacks Chain is a lovely design - in theory - but I'm in no hurry to make another one of these, despite loving the 'dancing circles' of the nine patch blocks! In many ways it was a car crash from start to almost the finish!

The start was fine.  I wanted a fun way to use my 'leaders and enders' which I piece when I'm using the sewing machine, so I don't have trailing threads.

I wasn't best pleased with the number of partial seams that the hexagons, nine patches and triangles needed in order to go together, and I'm not that good at them, either, really.

Then I didn't do a great job of applying it to some straight strips to make the size up and to straighten the edges, so it was all a bit baggy.  Then came the basting.  I ran out of masking tape (which I use to keep the back taut whilst I'm spray basting), so it was going to be a bit wrinkled - but I carried on, as I wasn't really in love with it.  I quilted it - but the wrinkle turned into a couple of tucks on the back of the quilt.  All my own fault, but annoying!

I squared up, put on the binding, and sewed it down, and almost became happy with it again.  By the time I'd sewn down the tucks, they hardly showed on the busy paisley backing fabric - so I've finished with something that I'm not exactly proud of, but that will keep someone warm when they need it, without me being embarrassed to put my name to it!
 

Wednesday, 20 September 2023

Penguin Terrace


So here is what I did with the tiny improv houses that I showed you last week.  Last week it was all Jo Avery.  This week, after an inspiring talk by Anne Kelly, this is what it has become - with fabric, lace, gimp and lots and lots of stitching!

The additions were laid on as raw edge applique.  Tree-like flowers were added in front of the houses, along with a few penguins that I found in my scrap drawer.


I paid attention to Anne's stitching.  Not only was it dense, making good use of decoration stitches, but it also changed direction to add extra interest.

I did that too.

I may not have reached Anne's quality of work, but, my goodness me I had fun!

So, here are a few details from Penguin Terrace.


I hope you enjoy seeing how it has transformed from last week to this week.

Now hanging on my wall.  Approximately 17" x 12"
 

Wednesday, 13 September 2023

And now for something a little different!

I took an (online) workshop with Jo Avery last weekend, courtesy of my Miniature Quilting Group - part of the Quilters Guild.

It was called Tiny Improv Houses.  Great workshop, and we were taught how to make town houses, mansion houses, different roof styles, how to add chimneys, how to make an improv tree (I still haven't made one yet - but I've got lovely notes on how to!), and finally, how to turn projects into pouches!

It was quite a day!  Very productive and lots of fun.

I'm not sure that I'd call the houses tiny (but I was making ones that were fitting into a two inch square a couple of years ago, so perhaps I don't have a 'normal' view on this), and the houses were finishing between 5" and 7" tall.

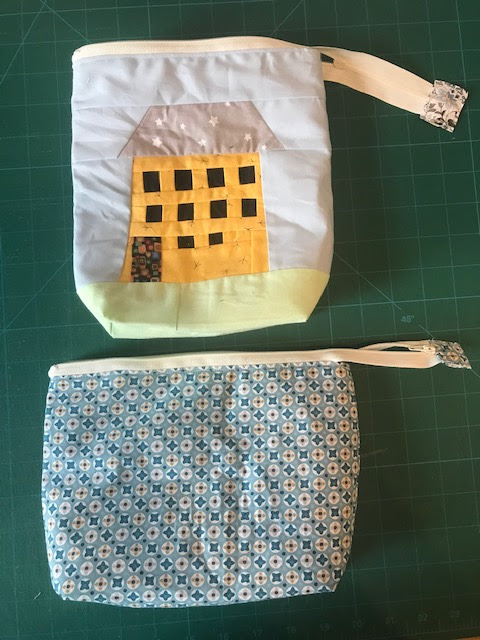
By the end of the day I'd made this short terrace which will become a small wall hanging (I've got plans to embellish and stitch on this!), and two pouches.  The lower one was made in plain fabric to make sure that I was understanding the ideas as there are a couple of twists on how I'd usually make a pouch.  The upper one (you get to see both sides) used two of the mansion houses that I made.

I love taking workshops like this!

So much entertainment and inspiration in just one day, plus it feels like a luxury to tell the rest of the family not to interrupt me, and just play for a day!


Wednesday, 6 September 2023

The next four blocks


 The next four in my Bobbin Challenge.

These are my blocks for Lace, Gold, Crystal and Tea / Coffee.

The tea / coffee block is one that may change - as 'china' comes up in a few blocks, so this might be swapped for that.  I'm considering sewing a coffee bean for this block instead - I'll let you know if I change this one!

I'm almost half way through the challenge now!

Wednesday, 30 August 2023

Another Four mini Blocks

Still working on my Round Bobbin challenge.  These next four blocks represent Willow (a cricket bat), Tin (a tin can), Steel (thimble, needle, scissors) and Silk (mini silk pyjamas).

Fun to use a range of techniques - hand and machine stitching, applique and additions.

I'm off to work on a the next block now!

Happy sewing!


Wednesday, 23 August 2023

Frame Quilt Finish

Finished! Hanging on the wall!  And yes, it could really do with blocking to help it hang a little flatter......
 The centre is made up of my quilt group's Frame Quilt challenge

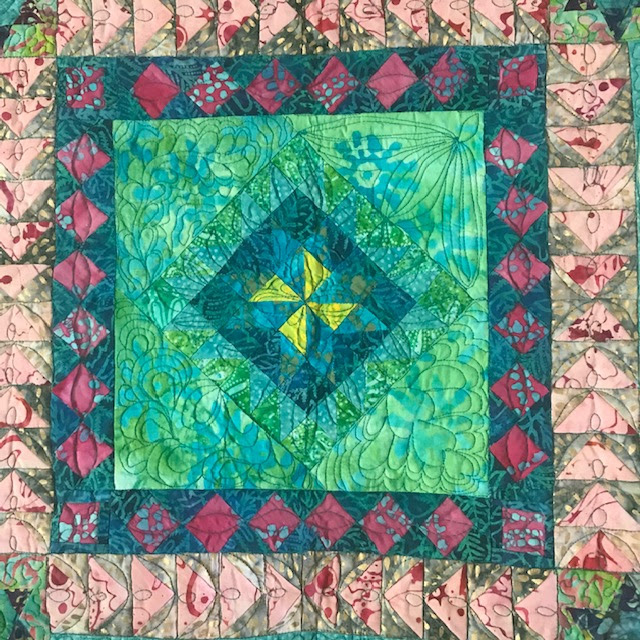
This is my centre block.  You can see the quilting, which I kept fun, with different patterns in each of the setting triangles.

The first border had an instruction to include squares.  I did mine seminole style, with framed squares at each corner.
The next border had to include triangles.  I went traditional with Flying Geese.
I was starting to run out of space - I knew that I wanted to insert this into a block challenge quilt that I'd set myself, which I'd started before knowing how many rounds of the frame quilt challenge there were going to be!

For that reason I combined the final two borders - with instructions for curves and stars.  The curves of gold bias binding give a little sparkle to the quilt.
Each border was quilted differently - linked 'eyes' on the squares, curves and 'eggs' on the flying geese, echo quilting on the bias tape and meander quilting on the rest of that border.
Working out from there I made a double line of 3" square blocks - these I quilted with oyster shells.

The final pieced blocks (6" square) and outer border with corner stones were all quilted with a meander - not shown in detail.

It was supposed to be complete when my DD2 completed her A level exams, but life got in the way, and neither the 88 batik blocks or the frame quilt centre were complete at that point!

I did manage to get it finished and on the wall in time for the results, though.  Phew!

And for anyone who is interested, she did jolly well, and will be off to Sheffield Uni to read Environment Science in September 2024!  So proud of her!
 

Wednesday, 16 August 2023

It's been a while!


I've been missing in action from my Blog for the last few weeks - but I have still been sewing!

Mostly it's been on a wall hanging quilt - lots of batik blocks, some of which I've shown you.  Next week I should be able to show you the finished quilt.

But in the meantime, here are the Round Bobbin challenge blocks that I've completed so far.

The first four are paper, cotton, leather and flowers.

The next four are wood, iron, wool and pottery (it's a ceramic button, which I'm sure counts!

I'm using my own hand dyed fabrics for the backgrounds, and then sewing / adding to them in order to try and get my idea for the theme accross.

It's fun - and at only 10cm (4") square, a very portable size!

Wednesday, 28 June 2023

Catching Up

A couple of weeks ago one of my quilting group members ran a mini-workshop on how to make this cute little 'origami' bag.

Isn't it fun?  A drawstring bag with two outside pockets, and really easy to make.


I remember making a couple many years ago, when my girls were tiny - and it was lovely to have a reminder about them and how to construct them!


 There is a very clear tutorial by Deb at OneLuckyDay right here.  Go ahead, take a look, grab two fatquarters and have a fun few minutes making one too!

I added a button to each side, but you could add any embellishment that you fancy - they could be a great vehicle for some lovely handstitching, for example.

Enjoy!

Wednesday, 21 June 2023

Back to my Blocks

I'm making good progress on my 3.5" square, mainly green batik, blocks.

Here are the next 16 blocks.

That's 32 down, 32 to go!

I'm tending to make them in batches of 4.  That way I have options when I'm chain piecing (although I only tend to work on two blocks at a time, otherwise I get confused!).

But I tend to choose and write out the cutting needed for each block in groups of four.

As you can see, I'm also choosing similar colours / fabrics for each set of four.  That way I'll have one for each side of the 'frame' that I'm going to sew.

It's a good theory, and I hope it will leave me with a good mix of colours and shapes on each side!


 Some blocks are easier than others - and some are more accurate than others!  Still, I'm sure that when they are all gathered together I won't feel too picky about the way that they are constructed!

Wednesday, 14 June 2023

Frame Quilt Progress

Each month at my quilting group we are being given a new instruction each month, until we have a finished frame quilt.


This month we were encouraged to add squares to a border.

I chose to use 'seminole' patchworking.  This is how I did it.

First I cut some strip sets across the width of my fabric - these were 1.5" wide and sewing them together.

Then I cut them into sections.

Can we gloss over the fact that I didn't really think, and cut them into 2.5" sections instead of 1.5" sections?!?

I then had to go back and cut them down.  And now I'm wondering what to do with my 1" sections that I have left!

Then I sewed them together offset.  I thought that seven would be the right number for my centre square, but I was wrong - I had to do some unpicking!

I also added background strips at each end, shown here on the right.

Then I trimmed it square - final width 2" - and added it to the square - see the photograph at the top of the post.  Oh, and I added corner blocks too.

A fun challenge!
 

Wednesday, 7 June 2023

Another Distraction!

I've had another distraction recently - an online 5 day challenge bookbinding course!  It was run by Ali Manning of Vintage Page Designs.

These three lovelies were the result - I'm thrilled with them!

Each book consists of 4 signatures - mine made from 200gsm watercolour paper.  Here they are folded, pressed and hole punched.
And all my covers were made of Kraft Tex - a paper 'fabric'.

This one was punched with my Crop-o-dile, but the other two were pierced with an awl instead, as the Kraft Tex was easy enough to get through.

The first book taught was with a chain stitch.
I used an elastic fastener.
Here it is from above.  Not perfect, but I'm pleased for my first effort.
On my third book I went for a different fastening - a simple strap version - but I think that I like the elastic better, as it keeps it more firmly closed.
So, chain stitch, wrapped running or long stitch, and running stitch.  Great additions to my number of little books!  

Many thanks to Ali for her clear instructions.  I'd really recommend her courses!
 

Wednesday, 31 May 2023

Side Projects!


I'm easily distracted, it seems!  Rather than getting on with either of my on going projects, I took an online workshop with Josie Dunn of FunkyNeedlework.com.

It was a fun class, and a good opportunity to use a little of the fabric that I'd won from Creative Quilting - the rainbow Dimples.

This is the wall hanging that I made (15" x 10"), where rather than actually stitching down each link, I opted instead to use a decorative stitch down the lines.

I wonder if I made it again whether I'd use fusible on the back of the fabric.  I can't quite decide.
This was  the piece before I backed and quilted it, with just the ends of the loops caught into the seams.
My next piece was made with the remains of what I'd already cut - so some loops made into a wave pattern (which I thought would be easier to quilt) and the 'inners' again trapped in the seams to make this cheerful fabric base.
This is the picture of the piece once it was quilted.  I just outlined the colour bits with gold thread and a straight stitch - nothing fancy!
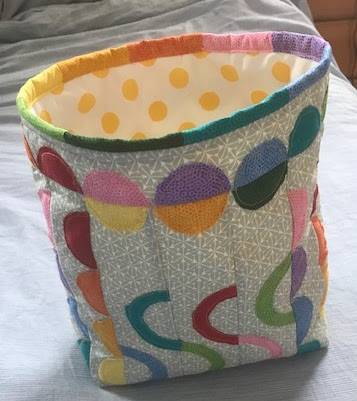
And here it is made into a bucket, with a rainbow binding.  Approx 12" high and wide.
  
It feels like ages since I've made one of these, but I haven't lost the memory of how to make them!  I'm pleased to have these two little finished items.