Wednesday, 23 March 2016

Sewing and Baking

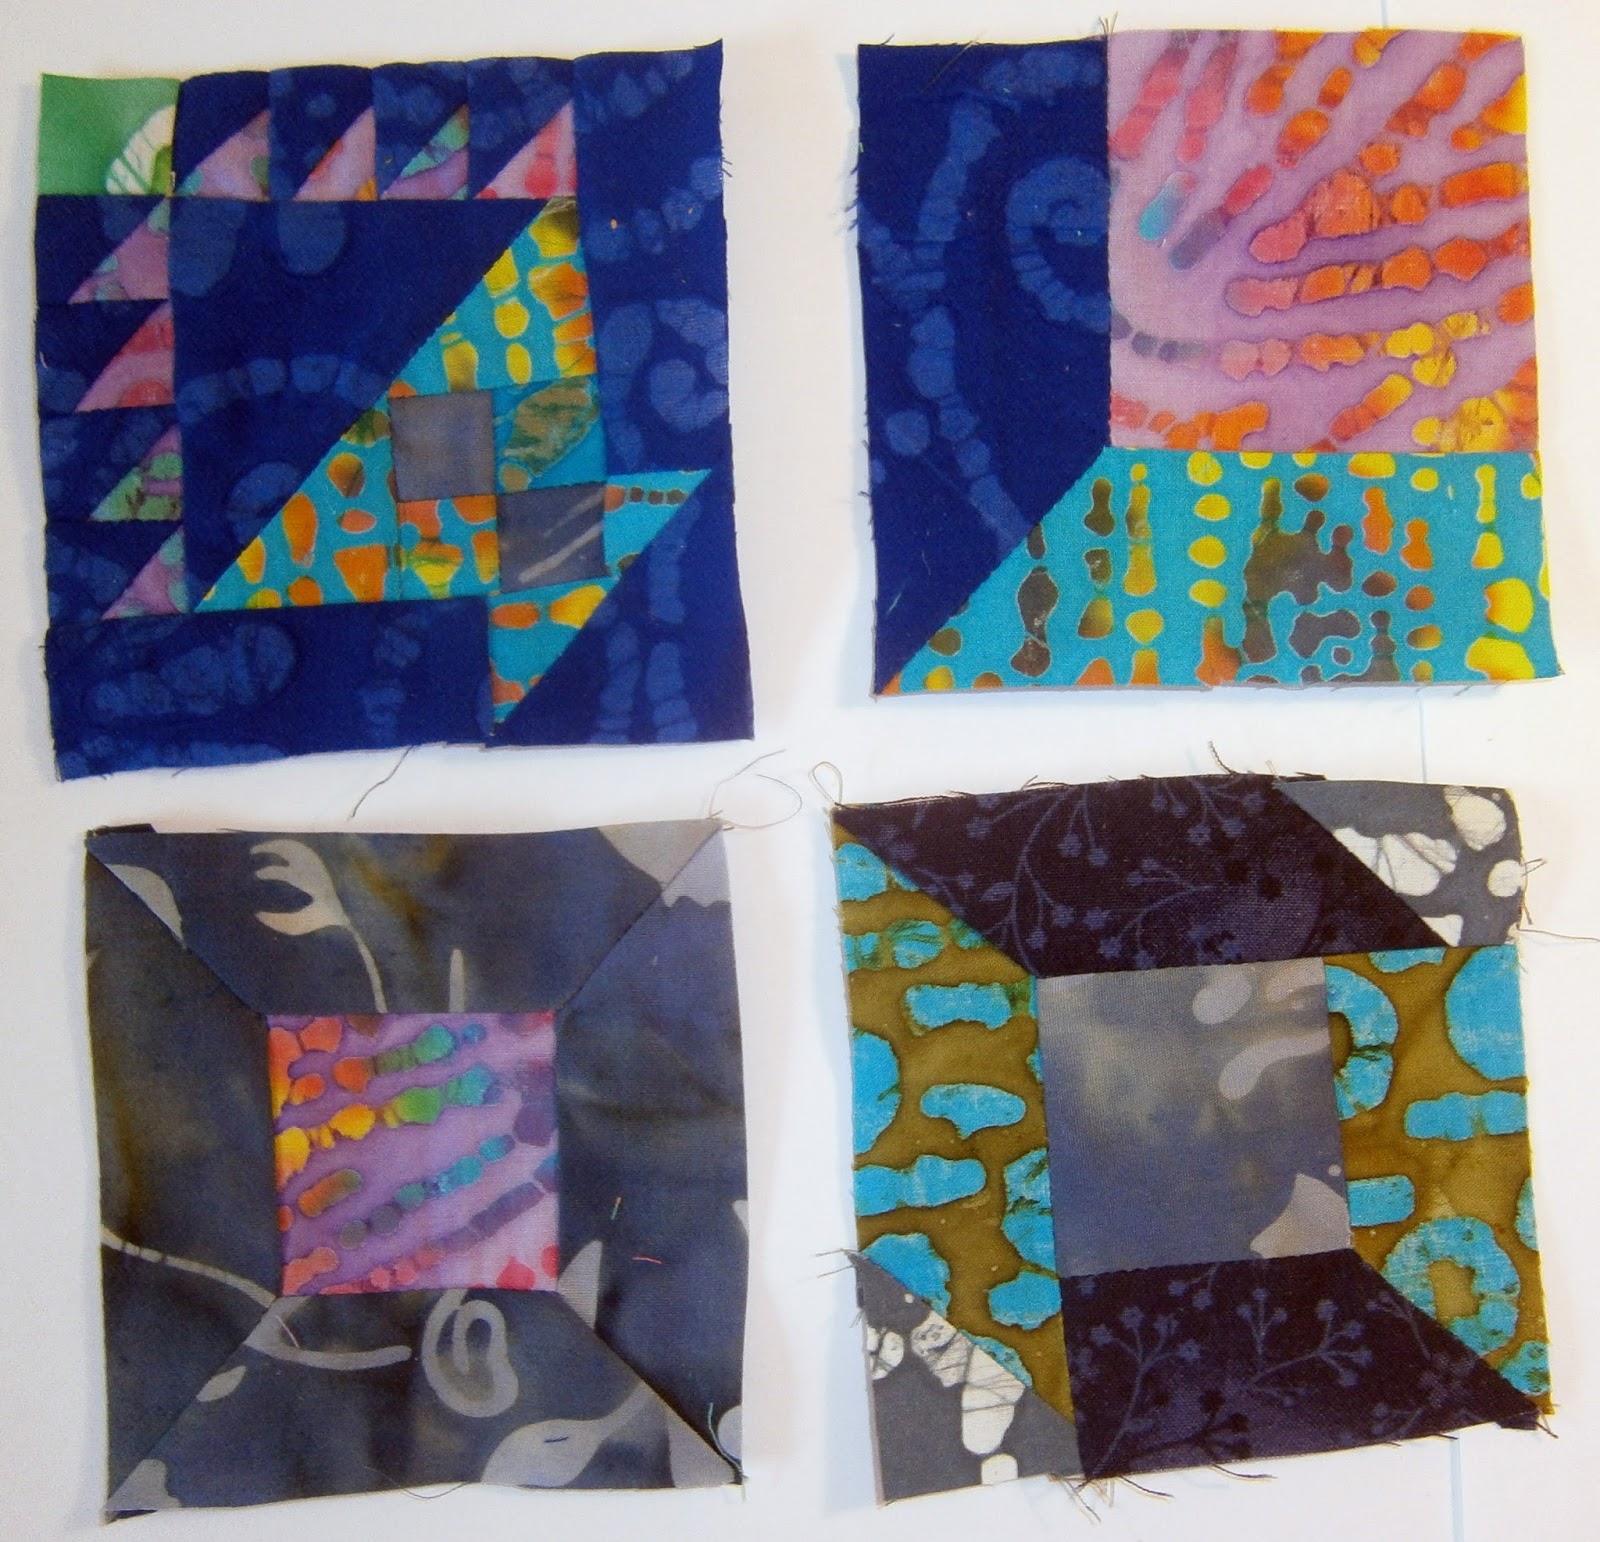
 More work on my 365 challenge - the only sewing that I've managed this week.

These two squares are 6 1/2" square (ish!) and each demanded many mitred corners.


 These are the normal 3 1/2" square and show the start of the mitred corner set of blocks.
 The rest of my time this week has been taken up with baking and birthday stuff for DD1.


The first cake of the week was made to celebrate the news that DD2 will be going (along with several of her friends) to the same school as DD1 from September.  I'm looking forward to them both having the same school holidays and training days again!
The second cake was my best attempt to represent Brighton Pier (and specifically the fairground rides on the end of it) in cake form.  This was the destination of the birthday treat day out on Saturday - and I think that I'm still recovering from it, although the girls have bounced back!

I also made some bread - a no knead recipe - for breakfast after the sleepover.

Just one more cake to make (for the actual birthday!) and my baking efforts for the week will be complete!

I'm hoping to get a little sewing done over the Easter break, but it's always hard to know how much will actually happen once we start enjoying the school holidays!

Happy Easter, Happy Spring, happy sewing, one and all!

Wednesday, 16 March 2016

Small Pleasures

 You know those weeks where they seem full, busy, chaotic - but you can't really find what took all the time by the end of them?  That was the sort of week that I had! 
In fairness, I did some useful sewing done, just not as much as I'd hoped!
 I made (in the company of lovely friends) some bunny bags this week, ready for Easter.  Based almost entirely on this tutorial by sewcanshe.com.  I love that by ignoring the face embroidery I can get a quick gift that looks like a bunny hiding in a bag!  If you have four charm squares, some ribbon and about 20 minutes you should give it a go!

I also made the first 6" block from the 365 challenge.  I'm starting to think that I need to buy more dark batiks to feed into the making as the project is eating them up faster than I was expecting.
 Time off for a bit of quilting retail therapy, provided by the lovely Isabelle of Creative Quilting who packed up a good sized chunk of her shop and brought it to my quilting group on Monday night.  So pleased that they are now stocking Aurifil - my favourite thread!  Also a new to me magazine title which I'm looking forward to reading.
Finally a showcase of Week 10 (although I need to check how I've got 8 blocks rather than 7 shown here.  It's entirely possible that the last one will reappear next time I show you a weeks worth of blocks too!

Some fiddly piecing - on that last basket the little half square triangles are 1" blocks, so only 1/2" shows once they are finished.  Lots of fun when they work!

Hope that you are finding fun and small pleasures this week too!

Wednesday, 9 March 2016

Katy Catchup

 Playing "Katy Catchup" with my 365 challenge this week!

So lovely to get to make the centre medallion - I had fun breaking out the bright batiks for it (whilst remembering to use some of the prints that I've been using in the darker blocks so that it has some continuity).

I wish that I'd got all the sub units right the first time, though.  I haven't taken a picture, but I originally put the block together with some of the flying geese facing the wrong direction.  I had to spend longer than I wanted unpicking it before resewing the right way around!
 These are the blocks from week 8 of the challenge.
These are the five from week 9 - we had two days to make the centre medallion, so only five small blocks.

I've nearly caught up!  Just last six days to make and I'll be there.

I've also got another sewing project with a deadline for the weekend, so I'd better get on with that too!


Wednesday, 2 March 2016

Distractions!

 I had intended to get back up to speed with my 365 challenge - but got distracted!

Instead I made these cards - free motion stitched a stick figure and the fabric balloons.
 Then I made the rings for Little Hazel, part 2.  Thanks again to Esther for her pattern!

You can't tell the scale from this photo, but it must be almost 30" across already - the pieces feel huge compared to the small ones that the 365 challenge demands!
 And I made these, from fabric mutt, who published a fab tutorial for these little fabric baskets that she called Pixie Baskets.

Two have been gifted for birthdays, one is holding my fabric scraps that are 'pre-made' units for the 365 challenge, and I have two more cut out and ready to sew.


Addictive?  You think???  They finish at 3" x 4" and are totally cute.

Ideal for all sorts of things!

Perhaps now I've got these little items out of my system I'll get back on track with my other projects!

Hope that you have some fun sewing planned too!

Wednesday, 24 February 2016

Happy Sewing

 I caught up with my 365 challenge - only to go away for a few days and so fall behind again!

This is the set of blocks for week 5.
 Week 6 is shown here.
 Week 7 here, and this is as far as I've got.  I think that I have a full week's worth of blocks to catch up with now!
Naturally the first thing I did when I got back from holiday was to ignore any current projects in order to create something completely new!

I bought some tartan remnants whilst away (can I recommend the Old Town Weaving Company at Castlehill on the Royal Mile in Edinburgh to you all?  £3 was the starting price for remnants - the smallest I bought was 8" x 51" which is incredible value) so made an oversized cushion with most of the fabric plus some curtain leftovers.  Perfect for my sewing room (where the curtains are) but apparently even more perfect for anywhere that DD2 happens to want to be!  Of course, you may get to choose your own colour ways rather than have the other three members of the family choose without reference to making a harmonious selection.....

Back to the sewing now - I'll see if I can catch up with those 365 blocks!

Wednesday, 17 February 2016

So Proud!

 I delighted to celebrate a finish of a quilt that isn't mine!

My DDs have been working on this together for a while, but they have finally finished their 'Blue Peter Quilt'.

If you live in the UK you will no doubt know the long running children's programme.  My girls are fans (as am I, still!).

The girls made this quilt for the presenters of Blue Peter, but have asked if they don't need or want to keep it, that they pass it on to Project Linus so that it will provide warmth and a hug to someone who needs it.

I'm so proud of my girls, who have worked hard to design, piece, applique and quilt this.  I can only hope that it's just one of many, but I think that they might rest on their laurels for a while.  Plenty of time in their future lives to take up a sewing craft if they want to!

Wednesday, 10 February 2016

Small items of Loveliness and a Shadow Quilting Card Tutorial

 First of all, here is the curly tree quilt again - this time showing you the buttons on it. My label is printed and ready to sew on the back, so it's nearly ready to go onto the wall!
 My first item of loveliness is this pincushion - made from the pattern that Benta shared here.

Very quick to make - the longest part seemed to be filling the bobbins to add into the petals!  I'm pleased with it and hope that my crafty friend will be happy with it when she receives it!
 Now, if you are short of an idea for a valentines day card, here is a fun idea that you'll be able to whip up in no time!

First of all transfer a simple design onto a small piece of fusible (my designs were approx. 2" square or 1 1/2" x 3".

Iron it (carefully!) onto a piece of craft felt.
 Cut out the design carefully, and iron it onto a background fabric (mine was just over 4" x 6").

Now choose a bit of organza - bright, subtle, the choice is yours.  Try it out over your felt and background fabric.  When you're happy with it, cut out a piece slightly larger than the background fabric.

When you are happy with your choice use a couple of pins to anchor it over the background fabric.
 Now choose a thread to contrast with the background - either an embroidery floss or a perle thread - and stitch a running stitch just outside the felt outline.

When you have finished, choose how to finish your card topper.

Mostly I choose to cut the organza and background to the size of the card, then turn back the edges of the organza and trim 1/4" from the background fabric.

My other idea was to trim the organza around the motif with a soldering iron.


 Of course, once you have the soldering iron to hand, its very tempting to add a little more decoration - too small to see, but I added some dots to the central card here.

Finally, grab your glue stick and stick the topper to the card.

A fun way to make a card for your sweetheart!
Of course, I've also been making  these 3 1/2" blocks for my 365 challenge.  These are the blocks for week 4.  I'm still playing Katy Catchup with this, but happily!

Tuesday, 2 February 2016

Taking up a Challenge

 Have you heard of the 365 Challenge Quilt?

It does what it says and is going to provide instructions for making a block every day for a year.  At the end of the year, if you've kept up, you will have sufficient blocks for a 90" square quilt top.

Not that I have any need for a 90" quilt top, you understand, but despite not coming across the challenge until late January, I thought that I'd like to join in.

The first blocks are fairly simple.  I have made the first 21 in a total of 3 3/4 hours.  I may be

 playing catch up for a while, as I suspect that as soon as I catch up I'll get tripped over by holidays and the like - but I'm enjoying the little (3 1/2") blocks so far!

And this is my mainly batik fabric pull for the quilt.  These early blocks are all in dark fabrics, for me, that's blues.  I'm looking forward to making some blocks with the brighter colours later in the year.
 You could join in too, if you wanted to!

365 - The Ultimate Sampler

I'm sure that it's going to be fun!

I have also managed a finish too.  This curly tree wall hanging is now complete.

This week I finished the hand sewn decoration (not quilting - I did it before I layered the quilt), machine quilted around the tree, bound it, adding corner triangles for hanging, and added some buttons.  Phew!

I forgot to take photos once I'd added the buttons on to it, though, so you'll have to wait for another day to see those.

I'm really pleased to use the fabric that DD1 gave me and some of the buttons that DD2 gave me for Christmas in this little project.  Now I need to find somewhere to hang it!


Wednesday, 27 January 2016

Self Improvement?

 It appears that it's a while since I last did much in the way of FMQ - and in particular feathers.

I decided to add a gently meandering feather wreath - but it took me most of the two laps required (one lap for each side of the spine) to feel that I'd got my rhythm back!  Still, better to have improved with that, rather than not to have given it a go at all!
 I also went ahead and added the circle to my Little Hazel.  I think that this might need a re-visit too, as one or two of the green segments are just slightly 'off'.  I'm sure that it would be better to greet the next stage with an actual circle!
 Two WIPS above, but this is a chance to show off my finish.  Not truly a quilt (fabric applied to a fleece, so only two layers, not three) I've made this as a camp blanket for one of my DD2's friends.
It started from the 'cut out' that was left after I made my curly tree for the mini tumblers quilt that I'm making.

I applied that (fused then machine sewed) to a contrast fabric then added further WOF strips in a quilt-as-you-go fashion until I'd covered the bulk of the fleece.

Then I added a 3" border to cover all the raw edges and frame the design.

Finally I added a fused name to personalise the blanket.  All made in plenty of time for a birthday next week!  I hope that she will like it.

Hope that you are enjoying some hobby time too!

Wednesday, 20 January 2016

Happy Sewing!

 This week has been a good week for small finishes - well, tiny finishes, really!
 
I've made cards for a couple of swaps and for a friend.
 
These homes on the fill are all made without fusible - just hope holding the bits of fabric into place until I stitched them down.
 These ones were made differently. Fused fabrics for the red and blue, then freezer paper leaves added on top to give a bit of depth.  Then the background was machine quilted.
 Another non-fusible piece.
 My last card - fusible applique with very dense quilting.

Lots of satisfaction from these makes!
 I also made a cushion (and, indeed, the cushion pad - the silver lining from finding the large bag of stuffing last week!). for my BiL.   I wanted to include green and gold with a bit of brighter stuff, so came up with this simple pattern which I then quilting in way that was trying to bring out the diagonal pattern.
 Naturally, I couldn't have a week with finishes and no starts, and as the first part of Little Hazel was released by Esther Aliu I decided to start that using some spotty fabric.

Of course, what you shouldn't do is decide that you will invest a very few minutes in starting it, when you are on a deadline to go out to the theatre.

You may find, ahem, that you leave off a crucial marking (in my case, which end of the template was the centre) and end up with more of a flower pixie hat than a flat quilt centre!
Of course, I then had to reinvest extra time to unpick those little seams and to make a properly flat version of it.  This looks much better!

Later today I'll add in the rest of the circle to complete the first step.

Thank you, Esther!

Wednesday, 13 January 2016

Stand out!

 I've made progress on my 'stand out from the crowd' quilt top.

I had hoped to be quilting it today, but when I went to the place where I *knew* I had a piece of wadding large enough (the quilt top is about 44" square, now that I've put the borders on) I discovered instead a bag of soft toy stuffing!  Doh!

Wadding on order...... but I've started some hand sewing on my applique tree mini quilt instead.
I did go ahead and make the warmers that I planned last week, though.  The rice was the right amount for three warmers with a handful of rice left over for the hens to eat!

I've been working on some fabric postcards too - I hope to finish and photograph them for next week!

Wednesday, 6 January 2016

Recycling Rice

Anyone else got bowls of raw rice now that the decorations are down?  I'm thinking that anyone who made sock snowmen but wants to store them without attracting mice will be in the same boat as me - with lots of rice on hand!
 
I think that I'll recycle mine into microwave heat bags.  I don't know if you have a favourite size / weight, but I do!  I make mine with 750g of dry rice, split into three equal 'bays'.  My starting size of fabric is 17" x 11", which I fold in half lengthways and stitch around two sides, before filling in thirds, sewing the top of each 'bay' as I go.
 
That will keep me out of mischief for a little while - longer if I add a proper covers for them too.  I heat mine for 2 mins 20 seconds in an 800w microwave.  Great for soothing sore joints or warming chilly feet!
My other mini project is a tumblers mini quilt, inspired by my new book and using some of my Christmas present fabric.
 
I made  this background - tumblers are 2" tall - and eventually ironed it.
 
 
Next I sketched a curly tree onto some heat 'n' bond, and ironed it to some pale pink fabric.
 
Then I had to cut it out.  Time consuming, as I had to do it over a couple of days. 
 
Now it's ironed onto the background ready to sew.  Hand or machine?  I'm not sure yet!
 
Hope that you have fun projects to start your new year with!