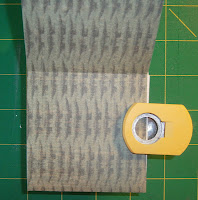
You will produce a book with three little pockets for tags, extra photos or ephemera.
Recipe: a square of paper, additional paper or card scraps, scissors, glue stick and double sided tape (or a sewing machine). Optional: circle punch, small hole punch, threads or ribbons
First of all put the paper right side down onto the table and fold the square in half. Whenever you fold, please try and do it as accurately as possible, and as flat as possible - you will get the best result by taking care at this point!

Next fold the sides into the middle so that you have the paper in quarters length-ways.

Now rotate the paper a quarter-turn and make the same three folds again, so that you end up with a piece of paper folded into 16 squares.

You get to play with scissors now. You need to make three parallel cuts, each of them three squares long. Start with a cut on a middle fold. When you've cut it three squares long, STOP! Now turn the paper half a turn, and cut three squares up on each of the quarter folds. Look at the photo if you didn't understand that instruction!,
Now start folding the squares concertina style. Just take one end and keep going until you get to the other end. You will end with a little stacked square.
The trickiest part now is to work out where your pockets are going to be. If you pinch the two squares at either end together you can see that they make the front and back covers. The middle twelve squares will make three pockets, and you need to have your paper in the right way for the pockets to be used - I go for the two facing up, one facing 'out' (opposite the spine of the book).
I then hold the papers together and use the circle punch to cut out a finger dip at the appropriate point to remind me what I'm doing in the next stages.
The next stage is to glue all the pages together, wrong sides together, to make lovely strong pages. If you are patient you can leave the book under a weight overnight. If you are impatient you can carry on with care. If you are really in a hurry you can sew around the pages and join pages and make pockets all in one!
Now using your finger dips as a guide, use two strips of double sided tape to make the pockets.
If you'd like, you can ink the edges of your book using a pen or ink pad, so that the white edges don't glare
Your 'basic book' is now complete! Well done!
Time now to add a spine (optional - it's as much for decoration as for strength). For this size book you will need to cut a piece of paper 1" x 3" and fold it in half. Use a glue stick (or stitch it) into place around the spine of the book. Again, leaving it under a weight to dry might be a good idea.
If you are making tags for the pockets, cut some more scraps (mine are approx 1 1/2" x 2 1/2") and make sure that they fit into the appropriate spaces. If you are going to add ribbons so that the tags can be pulled out easily, then punch a hole (mine is 1/16") and thread and knot your chosen ribbon through.
Now you can really go to town! Perhaps a little patch or two of paper as mats for small photos, a thin layer of gesso (or watered down acrylic paint) where you want to write, drawn or stamped frames or decorations, photos, appropriate quotes....... this is where it really becomes your book. It's your book, your contents, your style!
So, are you prepared to share your books? If you make one, why not leave a comment with a link to your blog or photo area (you could perhaps start a flikr album if you don't have a blog, and share the link with us?). I'd love to see what theme you choose and how your little book turns out!
Now that you've finished your own book, perhaps you'd like to buy another? No affiliation, but 'The Works' have a couple of quilt books for bargain prices, some other sewing books (I got a Joel Dewberry one) - and they often have scrapbook papers too. Ilike 15% off (until 2nd August) then press here and use the code that you are given when you check out. I bought three books and including P&P the total was under £12 - not bad if you compare it to the price of magazines!
Happy Crafting!


Thank you, I even have some scrapbook paper waiting to be used! These look fun to do at school too
ReplyDeleteOh, I wish I'd seen this earlier - how fab would they have been for teacher presents?!
ReplyDeleteThanks for the tutorial and the link Plum, they all look great.
ReplyDelete朝、目を開けてから、そばに置いてあるアイホンに朝の元気な挨拶をしたあなたと目を合わせたアイホンケースも元気になる。激安夏感謝セールやってるiPhone ケース ブランドショップを思いだしてください。アナスイ iphoneケースは当ショップの目玉商品として、超オススメ!今年のレトロブームに気づいたファッションガールズはぜひこの一品で気分を最高潮になれ~ディズニー iphoneケースDisneyといえば、だれも知っている世界的有名なブランド、使い勝手と美観を両立して特に、女性に向いている。子供時代の思い出いっぱい!
ReplyDeleteReally like all your little books... its such a lovely technique. I taught this as a class at The Beetroot Tree Gallery over a year ago. Its great that you can just use a sheet of scrapbook paper and its the perfect size (reversible paper is extra-good :-)
ReplyDeleteI liked the way you've punched out the semi-circles; looks very effective.